Hi friends! Thanks for supporting me all of these years. I decided it was time for me to get more serious about this blogging thing, so that included me jumping ship to a new website. Follow me over at
scratch-eats.com
See you there!

milking an almond
We don't use a lot of dairy products in our home. I do buy my bi-monthly gallon of milk to make yogurt with, and I like to keep a little on hand for cooking and baking, and we have a couple of our cheese staples, oh ... and butter. But seriously, compared to how much I used to rely on my milk and cheese, we're down A LOT. Part of it is because of what I've learned about what an excess of dairy products can do to you, but also because I'm lactose intolerant. Not severely, I don't notice it unless I consume too much, but enough to want to be extra cautious. But there are occasions when a nice creamy beverage of some sort is just a need. Am I the only one? Either for hot chocolate, or to add into cold or hot breakfast cereals, or frankly, just to drink. I do like to make my own soymilk occasionally, especially since I make my own tofu ... occasionally ... but it is a fairly long and laborious process. And sadly, I don't love the taste of fresh soymilk like I used to. I started buying almond milk, but then I discovered raw, homemade almond milk. And I just can't go back to the store bought stuff.
 In the past year or so, as we've made some adjustments to the way we eat, I've learned a lot about the health benefits of nuts and seeds. And especially about soaking them before hand. Nuts have a particular enzyme inhibitor which, when soaked, is released. And then all of this fabulous nutrition hidden inside is more readily available to digest. And you definitely want what's hidden in there. There are so many health benefits in nuts that unless you have an allergy, there is really no reason not to be eating them. You can follow this recipe with pretty much any nuts, but almonds have a nice balanced sweetness to them without an overwhelming flavor, so it's a good place to start. And I like this particular ratio of nuts to water (plenty creamy, but cost effective), but by all means, experiment with it.

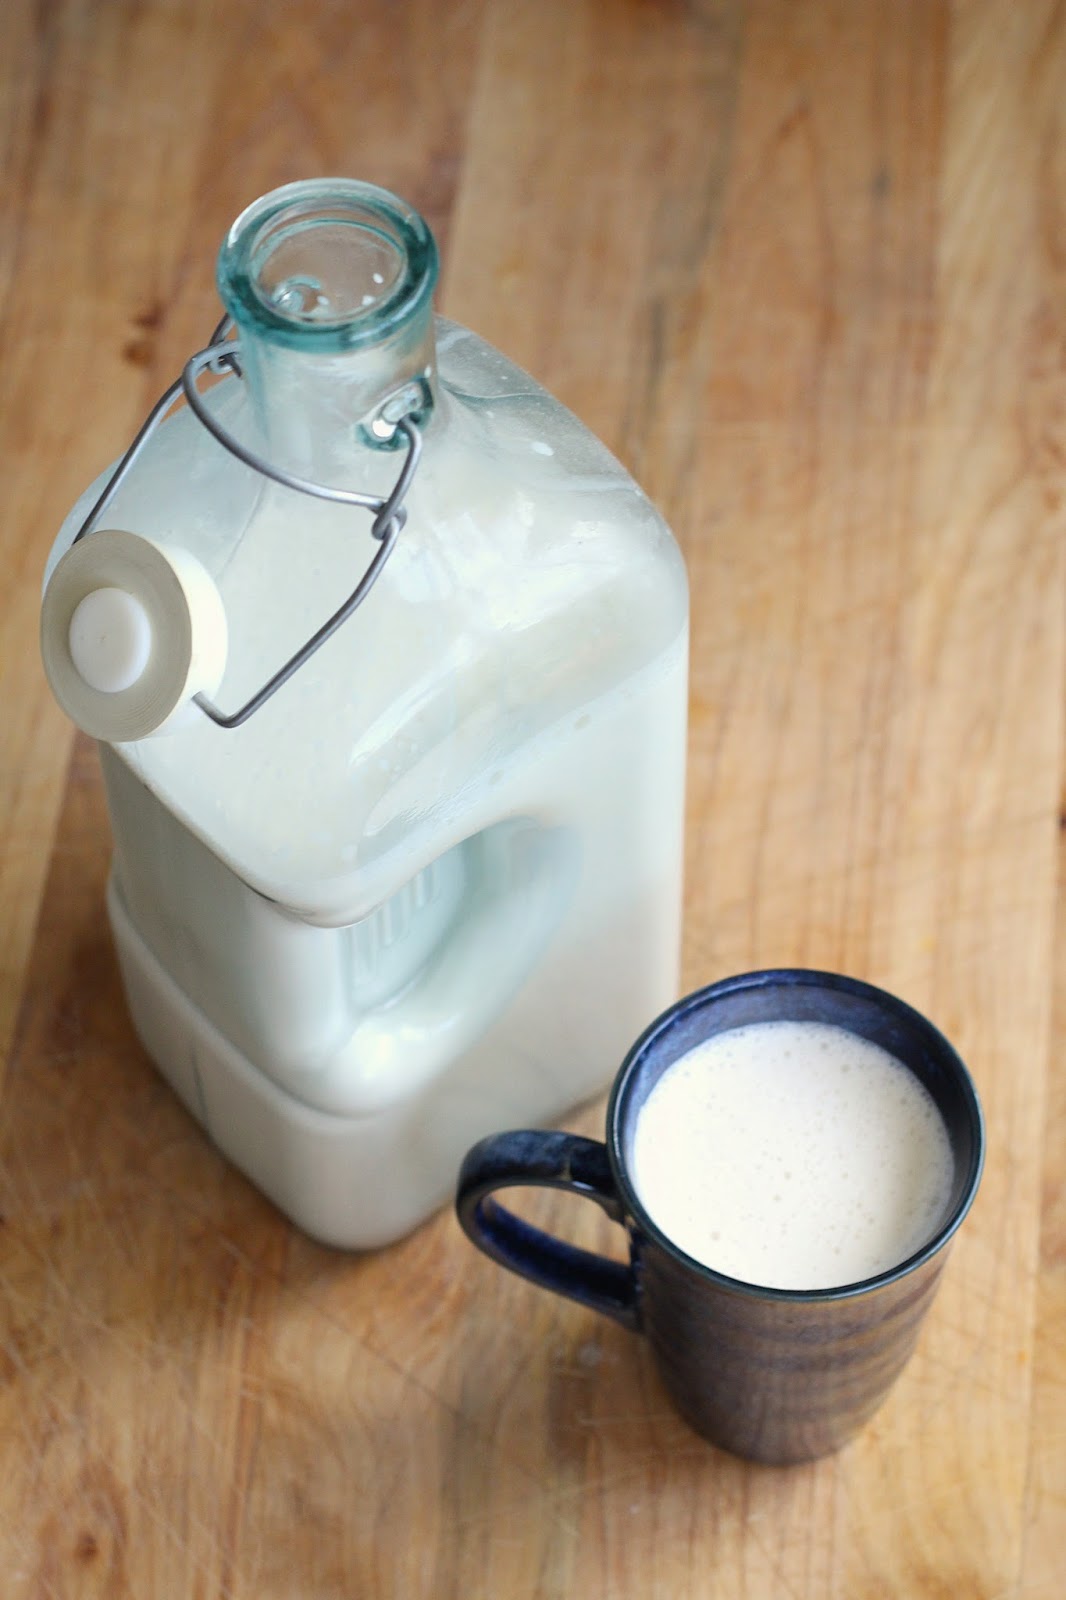
Once you've run the nuts and water through your blender cycle, you simply strain it. At this point, I like to add a couple of possible flavorings. Sometimes I add the seeds of a vanilla bean, or if I'm feeling extra decadent, I like to add a couple of tablespoons of raw cacao powder to make chocolate almond milk. And once you try this, you might not ever go back to store bought almond milk. You can't compare it to the silky mouthfeel and clean taste of homemade.
Homemade Raw Almond Milk
makes roughly 1 quart
1 cup raw almonds
4 cups purified water
1-2 pitted Medjool dates (optional)
1 cinnamon stick (optional)
- In a clean glass pitcher that holds at least 5 cups of liquid, combine all of the ingredients and let soak for 8-24 hours, or overnight.
- Add the contents to the jar of your blender and let it run until the mixture looks very milky and frothy. If you don't have a high-speed blender, you might need to let it run extra long, but it'll still work just fine.
- Pour the liquid into a nut milk bag or a piece of muslin over a fine mesh strainer, and squeeze out all of the milk into your desired container. Let chill and serve.
variations:
Once strained, you can clean out your blender jar and add the milk back in with your variation of choice:
seeds scraped from 1/2 of a vanilla bean
1-2 tablespoon raw cacao powder or cocoa powder
honey or pure maple syrup to taste (best if you don't start with the dates if you're using these)
cravings
I'm pregnant. And not to be all overly-sentimental, but it really is magical to know that my body is making a person. I love each of my kids so much and I'd do anything for them. But, at least for me, with the miracle of pregnancy comes a couple of very unfortunate changes. Those changes are my sweet tooth and weight gain. Usually, I don't crave sweet things. I love my occasional chewy chocolate chip cookie or bright lemon tart, and let's not forget a super rich chocolate cake smothered in ganache. But, in general, I usually would prefer seconds on dinner over dessert. But once I get over the hurdle of the miserable first trimester morning sickness (which is a total misnomer! Whoever thought to make the world think that the nausea subsides in the afternoon was lying), and I finally have some energy again, I suddenly want chocolate. No, really, like all the time. It hurts.

And you're thinking, "pregnant lady, then just eat the darn chocolate." But I really shouldn't, right? Not every craving is telling me what my body needs. Some are just crazy pregnant lady pointless cravings. So what am I supposed to do? I can't go out and buy a box of double chocolate magnum bars every time it hits. As much as I want to.
This exact thing happened to me the other day. And I didn't even have cocoa powder in my pantry. I'm not sure how in the world that could have happened, but it did. And I panicked. My chocolate hankering was a need. I tried to distract myself with chores like doing the dishes, but then I magically got stopped by the pantry, and started digging around for chocolate. So I tried again to take my mind off of it by checking my email, and somehow I ended up on pinterest, searching for no bake cookie recipes. The amazing thing was that I found several nutritious versions which got my mind racing. Somehow, I was able to scrounge up some usable ingredients to experiment with, and I got to work right away. The cool thing is, it all came together in minutes and I was eating my "cookies" within the half hour. And I didn't even have to feel bad because they were good for me!
The trick to this recipe is the dates. They are the base of the whole cookie. They are the structure and the sweetness. The fabulous thing about dates, particularly the Medjool variety, is that they are not only sweet but have a caramel-like complexity to them. But not only that, they are really good for you! Dates are great at aiding in digestion due to their high fiber content. They also provide calcium, selenium, magnesium, manganese, copper, iron, potassium, and a whole bunch of other beneficial nutrients. What's not to love, right?
Along with the dates, we're using coconut flakes, coconut oil, nut or seed butter, and oats, with the optional cacao nibs instead of chocolate chips. All of which love your body with fiber, protein, all sorts of vitamins and minerals, antioxidants, and if you use the seed mix, you'll even get omega 3's and all sorts of other benefits.
... As far as quantity goes, we should probably be careful with these guys. They are addicting. Because even if they're made with good sugars and fats, they're sugars and fats. Too much is still too much. But go ahead and have a couple. It's definitely better than eating your traditional cookies. And you'd be surprised how tasty.
Nutritious no-bake, gluten-free, raw, vegan cookie bars
makes 16
18 Medjool dates, pitted
1/2 cup rolled oats (gluten-free if needed)
1/2 cup chocolate chips (vegan if needed) or 3 tablespoons cacao nibs
2 tablespoons nut or seed butter (raw if needed)
2 tablespoons coconut oil, plus more for greasing the pan
1/4 cup unsweetened coconut flakes
pinch of coarse sea salt
raw seeds, optional (I always have a jar in my fridge with equal parts chia seeds, flax seeds, black and brown sesame seeds, sunflower seeds, pepitas, and sliced almonds to sprinkle on my yogurt or in my smoothies or whatever. I liked it in these cookies, but they're not necessary for flavor or structure)
- Generously grease an 8x8 baking pan with coconut oil.
- Pulse the dates in the food processor until coarsely chopped. You may need to stop and redistribute the contents because they tend to clump up a bit.
- Add all of the rest of the ingredients and pulse until medium chopped and well mixed. Don't over process, you want a little texture to it.
- Press the mixture into the prepared pan and freeze for 15 minutes or until firm. Cut into 16 squares. Put uneaten pieces back in the freezer for later.
birthday breakfast
My baby boy turned 2 today. Such a strange feeling. I mean, he is running and jumping like a two year old and feeding himself and speaks in sentences, so it shouldn't feel all that strange, but for some reason it does. I don't think I'll ever get over my children growing up. It's so thrilling to watch them learn and change and grow and become such remarkable people, but losing the baby-ness of it all is somehow so heartbreaking. Who knew parenthood would be two such extremes at the same time? I guess anyone who's had kids could have told me that. But it's one of those things I just didn't grasp until I had my own.
So one of our family birthday traditions is to have a special breakfast. And lunch. And dinner. And dessert--which is usually a cake of some kind. See, I'm not very good at fun kid stuff, and I'm working on that, but I've discovered, much like my mother, I show my love through food. So I ask my kids several days, sometimes even weeks, in advance what they want to eat on their birthdays. It's fun for me to hear the funny variety of things they'll say. Sometimes it's what we just ate for dinner, and sometimes it's something so way out of nowhere that I'm baffled at the response. But eventually, it starts to narrow down to one or two of their favorite meals. With my 4 year old it was "pink and chocolate and white chia pudding" and spaghetti and meatballs and a "big chocolate cake with ganache." With my oldest, it was very clearly a "pink cake with roses." But what do you expect to hear from a 2 year old? Not a whole lot past babbling. So my husband and I had to think really hard about the foods that he consistently enjoys. And we came up with a couple of very obvious ones. For breakfast it was either some form of eggs or waffles and cream and fruit. Dad, being the serious sweet food junkie that he is, of course tried to convince me baby boy likes waffles more. So it was decided on waffles. And though I would have loved to make some authentic Gaufres de Liege, I just didn't want to wake up at 4 am to start breakfast. (though unfortunately, thanks to a horrible thunderstorm I did end up wake up at 5:30 ... after which my scared little girls would not go back to sleep--which means neither did I ... but that's too long of a grumpy story for this particular piece of the internet) But I wanted that yeasty bite that comes with Gaufres de Liege. So why not make our favorite overnight yeast waffles instead? They're not dense and sturdy like the true Belgian waffle, but I'd say a pretty tasty relative. With a crisp crust and light-as-air crumb, soft enough that the roof of your mouth isn't raw at the end of the meal, but sturdy enough that it holds up to syrups and sauces and juicy berries and lots of whipped cream. Sounds like a dream, right? It kind of is.
 Gah! Do you see that bubbly caramelization pattern on the crust?
And the best part? Starting the night before means pretty much no prep in the morning. You'll look like a hero come birthday morning because you've managed to make a spectacularly decadent breakfast while still getting to see the look on your baby's face as he opens each present and thanks his sisters and daddy and mommy for them. All the while your house starts to smell fabulously of vanilla and a caramelized yeasty crust forming. Oooh, I want some more. Let's get started.
Overnight yeast waffles
makes 6-8 waffles (in a deep, Belgian style waffle iron)
 1/2 cup warm water (100-110°F)
2 1/4 (or 1 package) active dry yeast
2 cups warm milk (100-110°F)
1/2 cup butter, melted and cooled
1/2 teaspoon fine sea salt
1 teaspoon granulated sugar
2 cups unbleached all-purpose flour
2 eggs
1/2 teaspoon baking soda
2 teaspoons pure vanilla extract
pearl sugar or turbinado sugar for sprinkling, optional
Favorite waffle toppings
So one of our family birthday traditions is to have a special breakfast. And lunch. And dinner. And dessert--which is usually a cake of some kind. See, I'm not very good at fun kid stuff, and I'm working on that, but I've discovered, much like my mother, I show my love through food. So I ask my kids several days, sometimes even weeks, in advance what they want to eat on their birthdays. It's fun for me to hear the funny variety of things they'll say. Sometimes it's what we just ate for dinner, and sometimes it's something so way out of nowhere that I'm baffled at the response. But eventually, it starts to narrow down to one or two of their favorite meals. With my 4 year old it was "pink and chocolate and white chia pudding" and spaghetti and meatballs and a "big chocolate cake with ganache." With my oldest, it was very clearly a "pink cake with roses." But what do you expect to hear from a 2 year old? Not a whole lot past babbling. So my husband and I had to think really hard about the foods that he consistently enjoys. And we came up with a couple of very obvious ones. For breakfast it was either some form of eggs or waffles and cream and fruit. Dad, being the serious sweet food junkie that he is, of course tried to convince me baby boy likes waffles more. So it was decided on waffles. And though I would have loved to make some authentic Gaufres de Liege, I just didn't want to wake up at 4 am to start breakfast. (though unfortunately, thanks to a horrible thunderstorm I did end up wake up at 5:30 ... after which my scared little girls would not go back to sleep--which means neither did I ... but that's too long of a grumpy story for this particular piece of the internet) But I wanted that yeasty bite that comes with Gaufres de Liege. So why not make our favorite overnight yeast waffles instead? They're not dense and sturdy like the true Belgian waffle, but I'd say a pretty tasty relative. With a crisp crust and light-as-air crumb, soft enough that the roof of your mouth isn't raw at the end of the meal, but sturdy enough that it holds up to syrups and sauces and juicy berries and lots of whipped cream. Sounds like a dream, right? It kind of is.
And the best part? Starting the night before means pretty much no prep in the morning. You'll look like a hero come birthday morning because you've managed to make a spectacularly decadent breakfast while still getting to see the look on your baby's face as he opens each present and thanks his sisters and daddy and mommy for them. All the while your house starts to smell fabulously of vanilla and a caramelized yeasty crust forming. Oooh, I want some more. Let's get started.
Overnight yeast waffles
makes 6-8 waffles (in a deep, Belgian style waffle iron)
2 1/4 (or 1 package) active dry yeast
2 cups warm milk (100-110°F)
1/2 cup butter, melted and cooled
1/2 teaspoon fine sea salt
1 teaspoon granulated sugar
2 cups unbleached all-purpose flour
2 eggs
1/2 teaspoon baking soda
2 teaspoons pure vanilla extract
pearl sugar or turbinado sugar for sprinkling, optional
Favorite waffle toppings
- Start this batter the night before (or 8-12 hours before) you plan on cooking these waffles. In a large bowl, stir together the warm water and the yeast and let stand for 5 or so minutes to proof the yeast. Once the yeast is bubbles and frothy (proofed), add the milk, butter, salt and sugar, and mix well to combine. Add the flour and whisk vigorously to combine. You may want to use a hand mixer for this job. Cover loosely with plastic wrap and let sit on the counter overnight.
- In the morning, right before cooking the waffles, add the eggs, baking soda, and vanilla extract. Using a handheld mixer or a whisk, mix well until the eggs are well incorporated. Cook in your waffle iron according to manufacturer's instructions. But before you close the lid on that waffle to cook, sprinkle 1/2 teaspoon or so of the pearl or turbinado sugar over the top, if using. And I recommend that you do. I tend to prefer my waffles on a slightly darker crust setting. Serve hot with your favorite waffle toppings.
If making a large batch, keep your oven on the lowest temperature you can with wire cooling racks, and keep your cooked waffles in there until ready to serve.
< beginnings of a home dairy >
Let's talk about yogurt a little, friends. As far as I'm concerned, yogurt is the substance of life. We eat it for breakfast at least twice a week, but we also have it for snacks, use it in baked goods, use it in a dessert, serve it instead of sour cream when we have tacos for dinner, the possibilities are endless in my mind. But it gets expensive. Really expensive. Especially if you're trying to avoid synthetic hormones and antibiotics in your dairy. So a couple of years ago I started making my own yogurt, with very inconsistent results. One day it would be perfect, and the next it would be a curdled mess. But then about a year ago, I remembered that a good friend of mine had given me her old 2 quart maker, so I ventured out into the abyss that is my garage and miraculously dug out the box that it was in, and disinfected it and went to work. And it's completely changed my life. Yogurt couldn't possibly be simpler or more cost effective. (I make 1 gallon of organic yogurt every other week for $6! When I strain it for Greek-style yogurt, it ends up being about 3/4 gallon for $6. Where else could you buy that much yogurt for that cost?) Especially with the right tools. But I'm assuming not everyone has a generous friend who gives you a $50 piece of equipment for only one use, so I'm going to explain the whole process using your average-equipped-kitchen materials.
Basically, it boils down to a few simple steps. But knowing why we do these steps is pretty important to your success, I think.
 First, we heat the milk (0%~whole and anything in between, but if you know me I never use lowfat, so I always make whole milk yogurt) over low heat to 180°F to kill any bacteria that will interfere with the culturing process that we're trying to control. It's important that you don't mess with the milk at this stage. No stirring. So when I say low heat, I mean very low. Yogurt cultures are persnickety this way and won't like to be bothered. And though you haven't added them yet, it's like they know somehow.
Let it cool back down to about 120°F. Safer to err on the side of too cool than too hot here. 100°F~110°F is the ideal temperature for the live active cultures to work. Too cool and it could take days. Too hot and they'll die and your yogurt will curdle.
 Once cooled to just under 120°F, gently stir in the starter with about 1/4 of the warm milk. The starter will be your favorite brand of PLAIN yogurt clearly labeled "live and active cultures". I like a tangy Greek yogurt, so I started with with a true Greek cultured yogurt. But choose the ones you like, and if you love the result, you can keep reusing it indefinitely. Just store a little bit of each batch for the next.
 Once well mixed, pour your mixed, tempered yogurt to the container you'll be incubating it in, add the rest of the warm milk, and give it another gentle stir, and then you incubate it in an environment that will maintain a temperature of about 100°F~110°F for 6~24 hours, depending on the result you want. 6 hours will give you a thinner, more mellow yogurt flavor, 24 hours will be completely free of lactose (which might be good for some of you) but very strong. Almost ... gamey. I have lactose issues (along with the other 99% of Asians that do), so I go somewhere in between. Around 12~18 hours. I want as much lactose gone as possible, but the 24 hour yogurt just doesn't work for my palate. At this point, if you want that thick, Greek-style yogurt, You can line a sieve with cheesecloth or muslin over a bowl and drain for 4~6 hours until your desired consistency is reached.
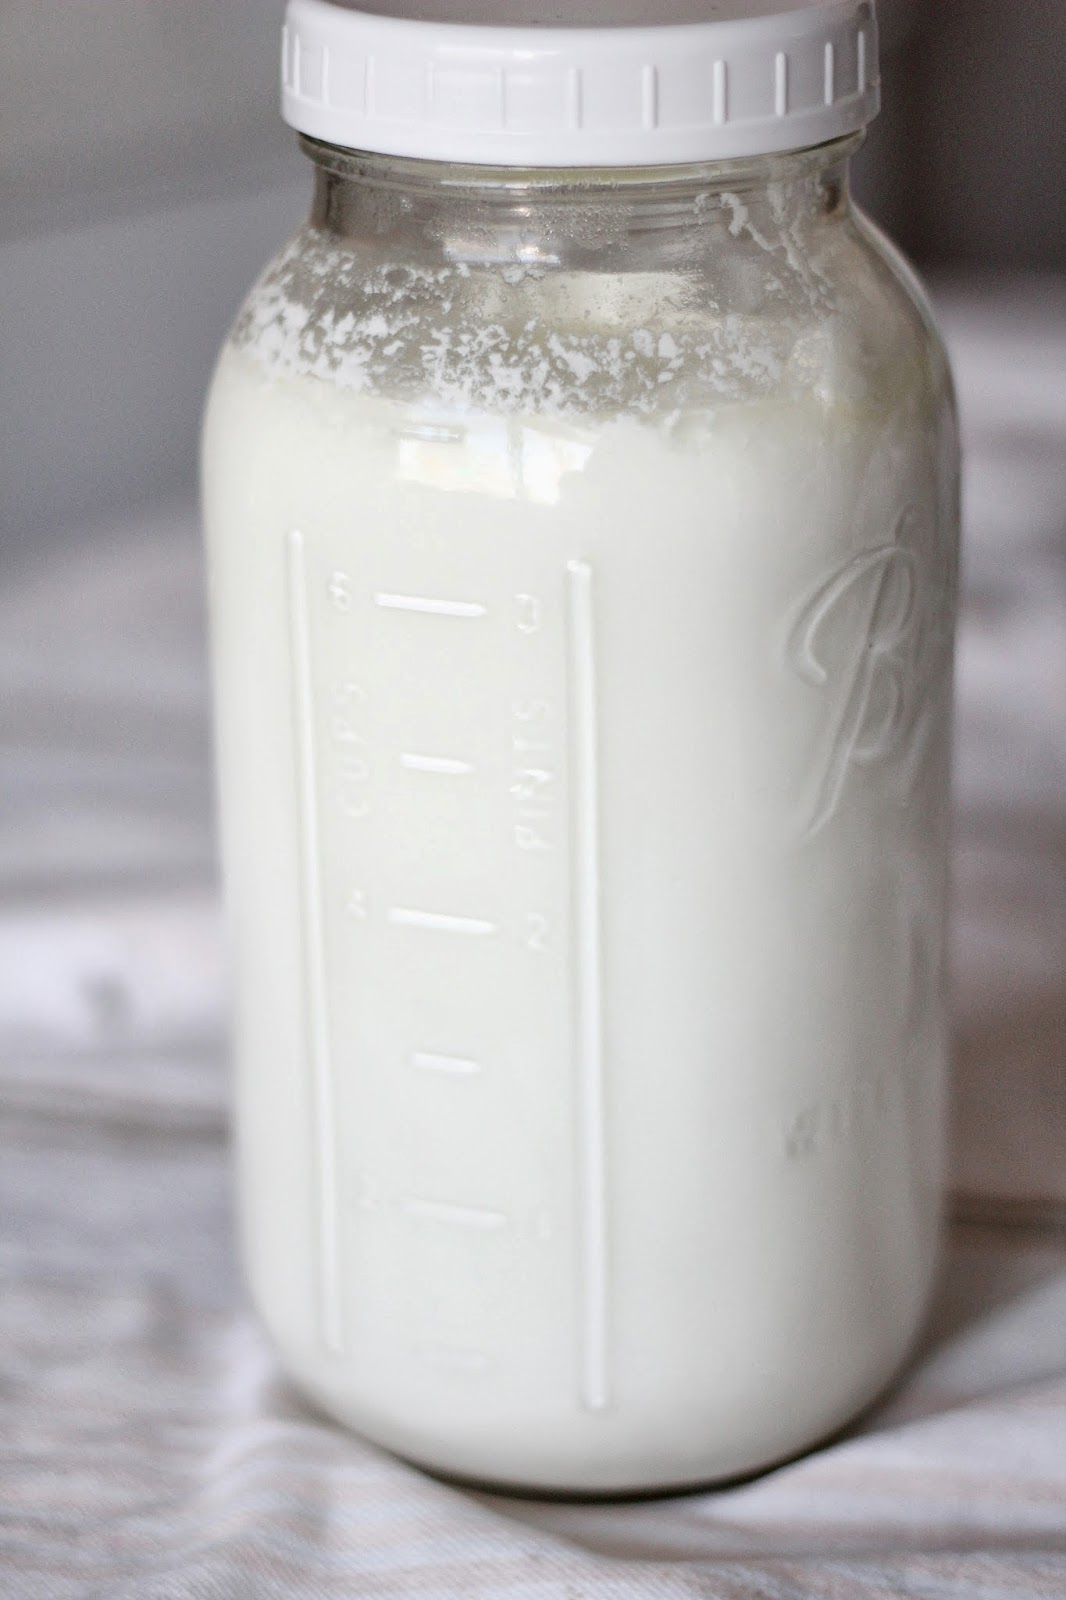 Relatively simple, right? The incubating part might be a little daunting, but there are ways to make it work. This time, I poured the contents into a 1/2 gallon mason jar, wrapped it in foil and a quilt, and placed it in my oven. I had heated my oven to about 100°F and turned it off before adding my yogurt. It turned out beautifully. Some people who are lucky enough to have an oven light that you can turn on and off like to just leave the light on. The heat from the light bulb in there is apparently enough to maintain a warm environment.
Other options for incubating include placing your container in a cooler and adding a few glasses full of hot water next to your yogurt. Or placing it in a preheated and turned off slow cooker. Or if you're doing it in the Summer, just leave your yogurt in the sun, believe it or not. I liked the oven, though, since it seemed reliable. Of course I prefer my yogurt maker since it's designed to maintain the perfect temperature. So if you love the results, and I think you will, you might want to someday invest in a yogurt maker.
Tools that are necessary or that I recommend:
candy thermometer or digital thermometer with an alarm. I bought mine at IKEA and love it
large, non-reactive, heavy-bottomed pot
cheesecloth or fine muslin
fine mesh strainer (sometimes when you heat up the milk, there will be little pieces. You want to start with a smooth base)
Metal spoon for stirring
large container for incubating (preferably glass. non-reactive, doesn't give off flavor, and see-through!)
Let's get started, shall we?
Homemade yogurt
makes 1/2 gallon, easily halved or doubled
 1/2 gallon of good quality, homogenized milk
3 tablespoons (1/4 cup and 2 tablespoons) of your favorite plain yogurt with live and active cultures
Basically, it boils down to a few simple steps. But knowing why we do these steps is pretty important to your success, I think.
Other options for incubating include placing your container in a cooler and adding a few glasses full of hot water next to your yogurt. Or placing it in a preheated and turned off slow cooker. Or if you're doing it in the Summer, just leave your yogurt in the sun, believe it or not. I liked the oven, though, since it seemed reliable. Of course I prefer my yogurt maker since it's designed to maintain the perfect temperature. So if you love the results, and I think you will, you might want to someday invest in a yogurt maker.
Tools that are necessary or that I recommend:
candy thermometer or digital thermometer with an alarm. I bought mine at IKEA and love it
large, non-reactive, heavy-bottomed pot
cheesecloth or fine muslin
fine mesh strainer (sometimes when you heat up the milk, there will be little pieces. You want to start with a smooth base)
Metal spoon for stirring
large container for incubating (preferably glass. non-reactive, doesn't give off flavor, and see-through!)
Let's get started, shall we?
Homemade yogurt
makes 1/2 gallon, easily halved or doubled
3 tablespoons (1/4 cup and 2 tablespoons) of your favorite plain yogurt with live and active cultures
- In a large, non-reactive, heavy-bottomed sauce pan or pot, heat the milk over low heat until it reached 180°F (82°C). Don't stir the milk.
- Once heated, let the milk cool to 120°F (48°C). You can speed up this process by placing your saucepan inside a large bowl full of ice water, or transferring your milk into a small bowl that will fit inside a larger bowl full of ice water. Taking care not to get any water into the milk.
- Once the milk has cooled down to 120°F (or a little lower), put the yogurt in the container you will be using to incubate it in. Pouring through a fine mesh strainer to catch any bits or the skin that has formed, pour about 1/4 of your milk into your container with the yogurt. Stir gently with your metal spoon.
- Once incorporated, add the rest of the milk mixture through the strainer as well. Give it another gentle stir, cover, and incubate for 6~24 hours, depending on desired consistency. (Suggested incubation methods above)
- If you want a thick, Greek-style yogurt, line a sieve with a piece of clean, damp cheesecloth or muslin, place it over a bowl and pour in your yogurt. Let it strain for 4~6 hours until desired thickness is reached.
< so many uses >
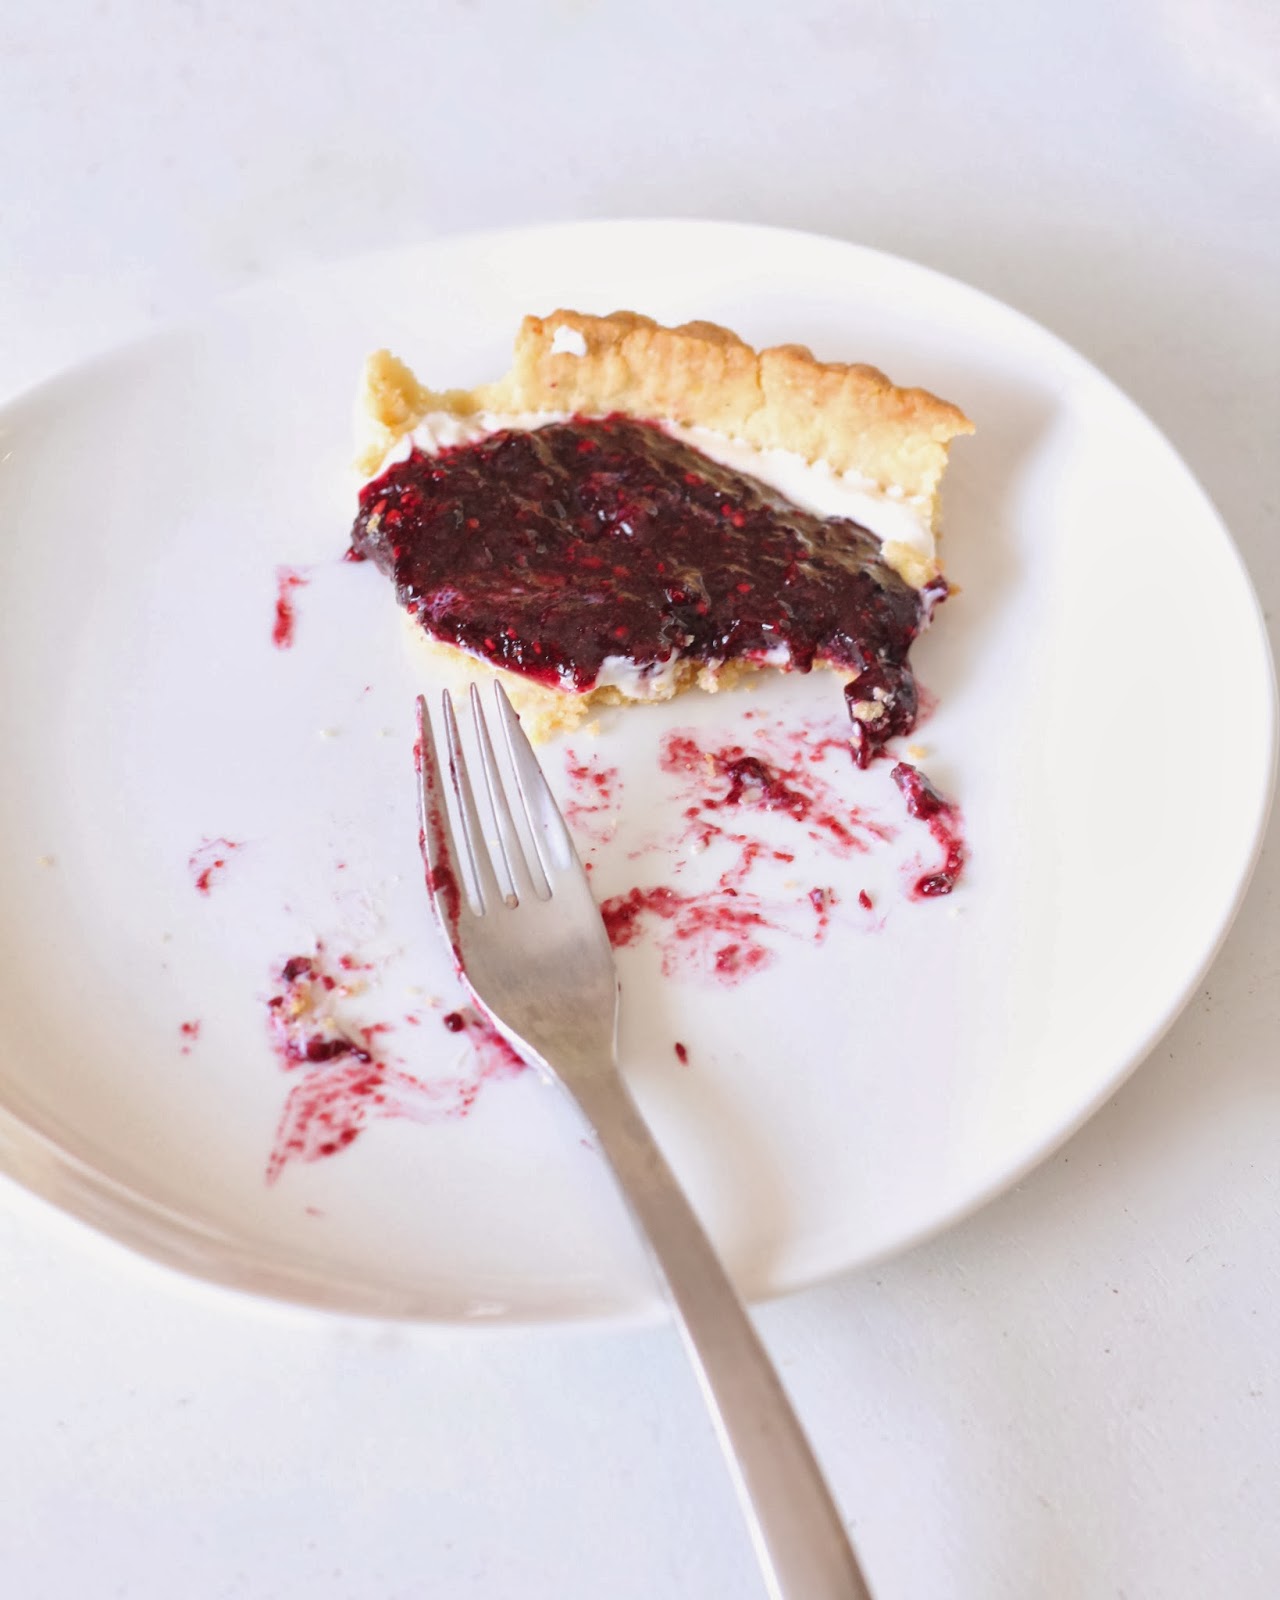
Remember my chia jam? Well, I did more than put it on bread or pancakes or waffles. I put it in a tart. With lightly sweetened créme fraiche. In a crumbly and crisp and sandy and slightly sweet cornmeal browned butter tart crust. And it was fabulous. My family and I accidentally ate the entire thing for second breakfast. Totally worth it.

1 tablespoon unrefined coconut oil
3 tablespoons water
1 tablespoon sugar
pinch of salt
5 ounces unbleached all purpose flour
2 tablespoons cornmeal (preferably stone ground)
1 teaspoon pure vanilla extract
for the filling:
1/2 cup créme fraiche
1 tablespoon raw honey*
1 tablespoon pure maple syrup*
1/3 cup blackberry chia jam or your favorite berry jam (blackberry somehow goes especially well with the cornmeal crust, but honestly any jam will be good on this)
*use your favorite sweetener for this. And do it more to taste. I liked it very lightly sweetened, I like the tang of the créme fraiche to shine through. But it's really up to you when you eat it. Just know if you're coming to my house for lunch, it'll be tangy.
Usually I feel really wordy, but I'm not sure I have much else to say. You know you want to try it. And by the way, this took me from start to finish, less than an hour. The crust is unbelievably easy, thanks to no chilling or rolling (just be careful when pressing in the crust to avoid cracking), and I'm embarrassed giving you a "recipe" for the filling because it's really something anyone could figure out. But the combination is sublime. So got for it. Make it for second breakfast. Or elevenses.
Blackberry jam and créme fraiche tart in a cornmeal crust
adapted from Paule Caillat's brown butter tart crust
makes 1 9-inch tart
for the crust:
6 tablespoons unsalted butter1 tablespoon unrefined coconut oil
3 tablespoons water
1 tablespoon sugar
pinch of salt
5 ounces unbleached all purpose flour
2 tablespoons cornmeal (preferably stone ground)
1 teaspoon pure vanilla extract
for the filling:
1/2 cup créme fraiche
1 tablespoon raw honey*
1 tablespoon pure maple syrup*
1/3 cup blackberry chia jam or your favorite berry jam (blackberry somehow goes especially well with the cornmeal crust, but honestly any jam will be good on this)
*use your favorite sweetener for this. And do it more to taste. I liked it very lightly sweetened, I like the tang of the créme fraiche to shine through. But it's really up to you when you eat it. Just know if you're coming to my house for lunch, it'll be tangy.
- Preheat the oven to 410°F. In a 4-cup or larger oven-proof bowl, combine the butter, coconut oil, water, salt, and sugar. Place in the hot oven for 15-20 minutes until the mixture is bubbling and the butter begins to brown. Remove the bowl from the oven and add the flour, cornmeal, and vanilla. Stir vigorously until it forms a ball that pulls away from the sides of the bowl with ease. If necessary, add more flour, one tablespoon at a time.
- Once the dough is cool enough to touch, form a slight disc shape and place it in the middle of your 8.5 or 9 inch tart pan. (Don't use a nonstick tart pan) Using your fingers, gently press the dough evenly throughout the pan. Use the bottom and sides of a measuring cup to continue pressing and smooth out the shape. You can use excess to piece together thin or cracking parts, but try to avoid cracks and piecing if you can, for appearance.
- Place the tart pan on a baking sheet, prick the base evenly with a fork, and place in the preheated oven. Bake for 15 minutes, or until lightly browned and shows very fine cracks. Set aside to cool.
- Meanwhile, mix together the créme fraiche, honey, and maple syrup together in a small bowl. Once the tart shell has cooled completely, carefully spread the sweetened créme fraiche evenly on the bottom of the crust. Then either with a knife or the back of a spoon, spread the jam over the créme fraiche mixture. If it's too soft, chill the filled crust before adding the jam. I left a slight border around the jam to show the layers. Serve within a few hours to avoid a soggy crust. Enjoy!
< on a kick >
It seems I'm on a bit of a chia seed kick lately. But honestly, I just use them a lot, and love finding new and exciting ways to eat them. This past week at my grocery store, blackberries were on super sale, so I bought several crates and froze a bunch, ate a bunch, and set the rest aside for jam. My husband thinks freezer jam is the sustenance of life, so whenever berries are cheap, I buy as much as I can and make several batches. But it's not something I really love to do for a couple of reasons. First of all, it's kind of a messy, big project. Sure, it's easy, but blackberries in particular stain anything they touch, and crushing them squirts juice all over the place. If you use a food processor (my preferred method) and make as large of a batch as I do, you have a lot of scraping and measuring to do. And all of that to add a bunch of refined sugar and pectin to an otherwise idealistically healthy food. Just never settled quite right with me. Don't get me wrong, I LOVE it. And we use it on everything. But knowing how fast my family goes through this stuff, I wanted to try an alternative. And chia seeds were my magical answer. With chia seeds, you don't have to use any added pectin, and guess what! No refined sugar. No sugar at all, if the berries you are using are plenty sweet. Unfortunately, blackberries are a little less predictable than, say, the perfect batch of Summer strawberries freshly picked from a u-pick farm. (Unless you live in glorious Oregon where they grow wild and are luscious, sweet, juicy little morsels without the slightest hint of bitterness ... not the case for store bought ones. Especially store bought ones in the middle of February) So I did use some honey. And loved it. Jam made with 3 super health foods and no other ingredients? I can live with that. And you know what else is awesome? You can totally freeze it just like any other freezer jam. Thaws like nothing happened.
Go ahead and research the health benefits of blackberries, honey, and I've already told you about chia seeds. I think you'll agree that this is a great way to go. Maybe along side a few jars of traditional freezer jam:)
Chia seed blackberry jam
makes about 4 cups
.jpg) 4 (ish) cups blackberries (or any other berry you want to use), gently washed and dried
4 (ish) cups blackberries (or any other berry you want to use), gently washed and dried
2 tablespoons chia seeds
small pinch of fine sea salt, optional
honey or any sweetener of choice to taste, optional
Go ahead and research the health benefits of blackberries, honey, and I've already told you about chia seeds. I think you'll agree that this is a great way to go. Maybe along side a few jars of traditional freezer jam:)
Chia seed blackberry jam
makes about 4 cups
2 tablespoons chia seeds
small pinch of fine sea salt, optional
honey or any sweetener of choice to taste, optional
- Place all of your blackberries and salt (if using) into the bowl of the food processor or a high speed blender and pulse a few times. Add the chia seeds and sweetener to taste. Let the machine run for a few seconds until the desired consistency is reached. Distribute the jam into clean, freezer-safe containers (if planning to freeze), and let rest in the fridge for 4 hours or overnight. (this allows the chia seeds to combine and gel with the liquid from the blackberries and get the right jammy consistency) At this point you can freeze them. Thaw completely before using.
Subscribe to:
Posts (Atom)