soul satisfying

Hi there, friends! It's been a long time. Way too long. I don't have much of an excuse, but let me try so you understand. I still love to cook, don't worry. But I had a baby, moved, traveled, moved again, and then the holidays started. And I guess this took a back seat. And I regret that.

My friends and I started a friends "Biggest Loser" which was an attempt to support each other in healthy weight loss. I still have about 8 pounds of my 80 (yes 80!) lbs I gained during pregnancy, so this has been a great motivation. And since we're sharing healthy ideas and recipes, it's helped to get me back on track with this blog.

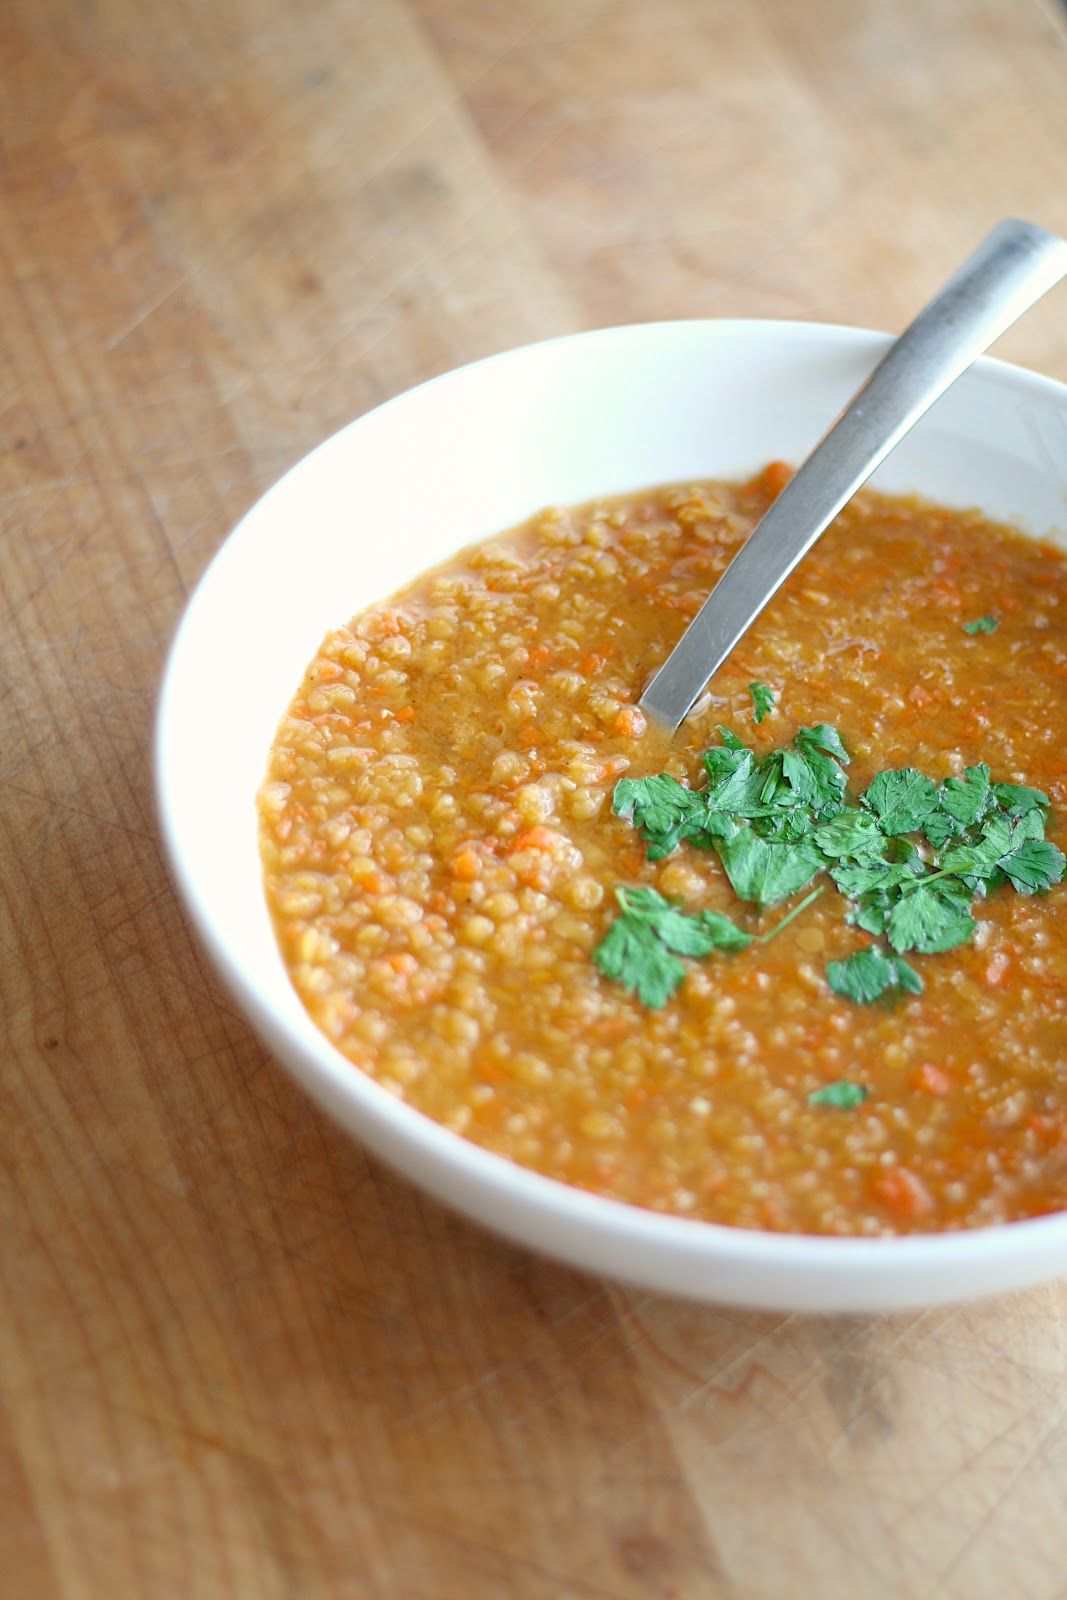
About a year and a half ago, my friend Beth decided to have a small get together for her birthday at a restaurant in Bloomington called Turkuaz cafe. It's a Turkish restaurant, and with the minimal experience I have with Turkish food, I was really excited to try. And since then I've returned a few times. One of my favorite things that they serve is their red lentil soup. It comes on the side of most entrees, and is simple and earthy, with the great thick texture of the broken down red lentils that I love.
 So after some serious searching, I found a recipe that I absolutely love (with some of my own adjustments), and to my surprise, it is unbelievably easy, quick, healthy, and delicious! I don't usually trust recipes where you throw everything in a pot and simmer, with no sauteeing beforehand, but this one works for some reason. So to my biggest loser friends, I highly recommend it. Lentils are packed with fiber, which keeps you full (and ... regular;)). And full of veggies and cooked with no fat, you can indulge and serve it with a drizzle of olive oil and a hefty slice of crusty bread. Or millet, which I love. Give it a try. I really recommend it.

Turkish Red Lentil Soup
About 6 servings
8 cups low sodium vegetable stock
1 large onion, chopped fine (I use a food processor)
1 large carrot, chopped fine
4 garlic cloves, minced
1 and 1/2 cups red lentils, picked through
2 tablespoons tomato paste
1 teaspoon coarse salt, such as sea salt or kosher salt
1 teaspoon cumin

  1. Add all ingredients to a large, heavy bottomed pot. Simmer until lentils and vegetables are soft and broken down. Serve with a drizzle of good quality extra virgin olive oil and fresh parsley or mint. 

gluten and dairy free

I feel like I've been made so much more aware of allergies recently. Especially that of gluten and dairy. I'm not sure if it's my imagination, but celiac seems to be much more common than it used to be. And have you ever noticed that most treats we eat have gluten and/or dairy in them? Sadly, at food-related get-togethers (and let's face it, most get-togethers have some kind of food), people with food allergies have to stand by while everyone else helps themselves to yet another decadent cookie or mini tart. And they think it's just a fact of life for them. It breaks my heart, since one of the most important points in my philosophy about good food is that it should bring people together.

But, because I don't have any food allergies, I rarely stock my pantry with gluten- and dairy-free items like coconut oil and sorghum flour. Last week we had a baby shower for a friend of mine from church and we decided to serve an array of cookies. But we have at least 3 women from our congregation (that I'm aware of) who can't eat gluten, one of them can't have gluten or dairy. And why should these wonderful women have to stand around and only eat the fruit while everyone else asks for recipes for their favorite cookies as they munch on their 10th cookie? (not that I can do that either, since I have a lot of baby weight left;)) But I can't afford to purchase alternate flours and fats for just one evening of cookie celebration.

I assume a lot of you have come across this dilemma at one time or another, which is why I wanted to write this post. I have 2 simple solutions for you. One is made is peanut butter, though, so obviously be aware of peanut and other tree nut allergies if you're going to make this.

update: I've made this with soy-nut butter for a family with gluten, dairy, peanut, and tree-nut allergies all in one family, and it was very successful. The texture and flavor were a tiny bit different, but not significant enough to not recommend using it. In fact, I highly recommend it. My little taste testers ate them all right in front of me:)

I hope this post can help a lot of you help other people feel more included in social gatherings, or if you have these intolerances or allergies yourself, I hope this brings you a little bit more joy in your life. You don't have to give up enjoying food! (And you should look into learning Japanese cuisine, because it is meant for you!)

3 ingredient (or an optional 4th) peanut butter cookies
makes about 24 cookies
2 cups peanut butter
2 cups granulated white sugar (do not replace with brown sugar, it'll ruin the texture)
2 large eggs
2 teaspoons pure vanilla extract (optional)
  1. Preheat the oven to 350°F. Line 2 baking sheets with parchment paper or a silicone baking mat.
  2. Mix together all of the ingredients until smooth.
  3. Drop a rounded tablespoon (I use a 1.5 tablespoon cookie scoop) onto the cookie sheets, at least 1 inch apart. You should get about 12 on each cookie sheet. Roll the dough in your hands to make smooth balls and lightly press flat. Press the tops in a criss cross pattern with a fork.
  4. Bake the cookies, one cookie sheet at a time at 350°F (175°C) for 7~9 minutes, until edges look slightly crisp, but the centers look a little underdone. Do not overbake the cookies or they will be brittle and dry. Let the cookies finish cooking on the hot baking sheet on a cooling rack for 10 minutes before transferring them directly to a cooling rack. Let cool completely before serving.
Old fashioned coconut macaroons (adapted from America's Test Kitchen Family Baking Book)
makes about 24 cookies
5 cups (20 oz) sweetened shredded coconut
6 large egg white
1/2 C sugar
1/2 teaspoon salt
1 teaspoon pure vanilla extract
  1. Pulse the coconut in a food processor until fine, 6 to 8 pulses, and transfer to a large bowl. Process the egg whites, sugar, salt, and vanilla extract together in the food processor until light and foamy, about 15 seconds. Stir the egg mixture into the coconut until combined. Wrap the mixture tightly with plastic wrap and refrigerate for at least 30 minutes, and up to 2 days.
  2. Adjust the oven rack to the middle position and heat the oven to 375°F. Line 2 large baking sheets with parchment paper or silicone baking mats and grease the top. After resting the coconut mixture in the refrigerator, give it a quick stir to redistribute any settled liquids. Using wet hands, roll 1 heaping tablespoon (I used a 1.5 tablespoon cookie scoop) of the mixture into a ball and lay them in the prepared baking sheets, spaced about 1 inch apart. You should have about 12 on each baking sheet.
  3. Bake the macaroons one baking sheet at a time, until light golden brown, 13~15 minutes, rotating the baking sheets halfway through baking. Repeat with the second baking sheet.
  4. Let the macaroons cool completely on the baking sheets before serving, about 1 hour.
Now go out and get gluten-and-dairy-free-without-any-special-ingredients baking!

comfort

I think we can almost all agree that lasagne is in everyone's top 10, right? It's comforting. Everyone's mom made it a different way, but everyone seems to have fond memories of how their mom made it. And my dear friend Rachel, a fabulous massage therapist (who has healed my aching pregnant back on too many occasions to count, bless you, Rachel!), claims it's her favorite dish of all time. And asked me to teach her how to make the ultimate lasagne from scratch.

I don't actually remember my mom making lasagne. But I do remember liking it as a kid. The first time I had a lasagne that blew me away, though, was my sister's. She was in college, I was in high school, and I was always impressed with her food. In fact, she's the real reason I started cooking. I wanted to learn to cook like her. And this was the first dish I insisted she teach me.
Lasagne alla Bolognese. Not to be mistaken with the more commonly copied version here in the U.S., Lasagne Romana. Both are fantastic and hearty and satisfying, but I tend to favor the former. The creamy bechamel, the hearty bolognese, all layered together into this dense, rich, comforting meal. It's hard not to overeat when this is for dinner. I did try. I kept finding myself going back for more, though.

Of course I can't really claim it's the ultimate lasagne, and somehow it always turns out better when my sister makes it, but it's one I'm proud of. And after all these years, I've yet to find a recipe that I like better.

Lasagne alla Bolognese
makes 1 9x13 inch pan, however many people you think that'll serve;)
1 box no-boil lasagna noodles (I use Barilla brand)*
2-1/2 C grated mozzarella cheese
1 C finely grated parmigiano reggiano cheese

for the Bolognese sauce:
2 cans crushed tomatoes
1 medium yellow onion, chopped fine (
I use my food processor)
equal amount of carrots, chopped fine
1~2 stalks celery, chopped fine
4-5 cloves of garlic, minced (optional)
vegetable or olive oil
1 lb lean ground beef
1/2 C red wine (optional)

for the Béchamel sauce:
3 T butter
3 T flour
3 C milk
1/4 onion, chopped fine
salt & pepper to taste
1/8 t grated nutmeg (optional)
  1. For the Bolognese: In a large pot, cook onions, garlic, celery and carrots on medium-high heat until soft and slightly browned, stirring constantly. Once cooked, add beef, breaking up as you go. Cook through. Add red wine, if using, and cook until completely evaporated. Add the crushed tomatoes, and cook, stirring constantly, until slightly thickened. Let simmer for 30~45 minutes at least. Longer, if you have time. The longer it simmers, the deeper the flavor.
  2. For the Béchamel: In a medium pot, melt butter and cook onions until soft. Add flour and stir constantly. Add milk gradually and stir quickly and make sure no lumps form. Add salt and pepper and nutmeg and combine. Keep cooking until sauce thickens. Set aside.
  3. In a 9x13 inch pan, pour a layer of Bolognese sauce on the bottom. Layer with 3 pieces of lasagna noodles. Top with Béchamel and 1/3 of the cheese. Place 3 more pieces of noodles. Repeat until no noodles are left. I put a combination of Bolognese & Bechamel with left over cheese on the top layer (because my husband insists that we have Bolognese on top).
  4. Bake at 375° for 45 minutes. Take the foil off and let bake for another 10~15 minutes until the cheese is bubbling and browned. Pull out of the oven and let cool for 15 minutes before serving.
* I do realize that using boxed, no-boil noodles takes away from the "made from scratch"-ness of the dish, so if you'd like, by all means make your own homemade noodles. I figure lasagne is a time consuming enough dish that we can cheat with 1 ingredient;)

    quick and easy and fancy

    Affogato. A dessert I never indulge in because I don't drink coffee. And though I've used Pero as a coffee substitute for many recipes, for some reason it never occured to me to use it in this simple application. So though I admit that this in not a from-scratch recipe (though now I'm tempted to post about homemade vanilla ice cream and how it really IS worth the time and money), I wanted to share. I made this for dessert last night and my kids loved it! My 3 year old asked for more. And my "I don't like bitter food" husband even liked it. Without any added sweetener of any kind. This is coming from a guy who wants me to add sugar to his hot chocolate, so I think it was definitely a success.

    And here's how simple it is. 2 ingredients. Vanilla ice cream & pero. And since Pero acts like instant coffee, there's no brewing involved. And even if I'm all about the labor intensive process of food, I also like a quick fix once in a while. A good one. And this is. I feel like I'm far away in a tiny street café in Italy. Because, afterall, this is an Italian dessert.

    Coffee-free Affogato
    serves 4
    1 C hot water
    1 tablespoon Pero (I make it extra dark for this particular recipe. For drinking, I use 1 teaspoon)
    4 scoops of your favorite vanilla ice cream
    1. Place one scoop of ice cream in 4 seperate serving dishes. I like to use little cappucino cups for this, but any small dish will work.
    2. Stir the Pero into the hot water until dissolved and pour about 1/4 cup into each serving dish. Serve immediately.

    breakfast kick

    I guess I've been on a bit of a breakfast/brunch food kick, and it might be because my cute husband was home for 3 weeks over the Christmas break. It was so nice! Especially because he spoiled me and let me sleep in every morning that I wanted to. Which was most mornings.

    And like I've mentioned before, he loves sweet food. So on the rare occasion that I got up with everyone else, I thought I should be sweet back and give him his favorite breakfasts. Hence the waffles from the other day, and now french toast. Although this french toast was after the break this morning. Either way, it's my way of showing my appreciation for my sweetheart. And it's fun to indulge once in a while.
    And I have a pretty strong opinion about french toast. I think most people do. I think french toast is best made with quality bread. Challah and brioche are great, but honestly, my favorite is when it's made with a good crusty loaf. The crust gets the right kind of chewy, and the crumb absorbs the custard perfectly and develops a slightly crisp crust. It's the only way to do it. Just make sure your bread is at least a day old. And if it's a REALLY crusty loaf to begin with, slice it on the thin side and let it soak longer in the custard. Or you won't be able to cut through it too well. I always use my own homemade bread that I bake from my favorite bread book.

    My French Toast
    serves 4 (or less, if you have a big eater)
    1 1-lb loaf crusty white bread, such as a simple boule, sliced about 1 inch thick

    1 cup milk
    2 eggs
    1 teaspoon cinnamon
    1 tablespoon light brown sugar
    2 teaspoons pure vanilla extract
    1/4 teaspoon fine(as opposed to coarse, not quality) salt

    butter for the griddle
    1. Preheat the oven to lowest setting and place an oven-proof platter in the middle of the oven.
    2. In a shallow mixing bowl (I always use a ceramic or glass pie plate), mix the eggs and cinnamon together. This encourages the cinnamon to properly get mixed into the batter as opposed to sitting on top. Add the milk, sugar, vanilla, and salt and whisk until combined.
    3. Melt 1/2 tablespoon of butter on a griddle heated to medium-low. Soak 2~3 slices (depending on the size of your griddle) in the custard, about 10 seconds on each side. Let excess custard drip off and place each slice on the griddle in one layer. Once the first side is golden brown, flip it over and cook the other side through. Once cooked through, place the finished slices on the platter in the oven to keep warm. Repeat with remaining slices.
    4. Serve with your favorite toppings.

    Happy New Year!

    We started the year at church, with a special Sunday brunch in the morning. My sister taught me this recipe for waffles a while back, and I've tweaked it a little here and there and added our new favorite topping to the mix. A little rich, maybe, but why not start the year with deliciousness, right? We did, after all, practically detox on all Japanese food for the following week. Japanese food is good for that.

    And speaking of Japan and the New Year, one of my new year's resolutions is to be on here at least once a week. And at least one Japanese recipe a month. Hopefully more often, but gotta start somewhere when somehow I've lost some steam. I blame the pregnancy, but it's hard to use that as an excuse when I've been cooking a lot since the second trimester. Let's blame the major lack of sunlight in the Winter months instead.

    I have a passion of my culture and food is so central to it. So why not explore it more and share it with you, my dear friends? So hopefully I still have supporters and followers and please continue to have faith in me. I'm back for real this time, so please frequent this humble little space on your interesting-things-online hunting from time to time.
    Our favorite wafffle/pancake/french toast topping is a banana caramel sauce. I got the idea from a book I bought on clearance at TJMaxx one day--purely an impulse purchase. But not one I regret. The dark, rich caramel sauce coating each piece of banana is divine on top of a rich breakfast staple like waffles. And these oatmeal waffles are buttery and tender but crisp and that comforting oat flavor goes so well with it. So when you're feeling decadent and in need of an indulgence, have fun with this easy, probably mostly pantry ingredients waffles recipe.

    Oatmeal waffles
    makes about 6 large waffles, depending on the size of your waffle iron
    1.5 cups unbleached all purpose flour
    1 cup quick oats
    1 tablespoon baking powder
    1 teaspoon cinnamon
    2 tablespoons dark brown sugar
    2 eggs
    1.5 cups milk
    1/2 c melted butter, cooled slightly
    1 tablespoon pure vanilla extract
    1. In a medium bowl, whisk together the flour, oats, baking powder, cinnamon, and sugar.
    2. In a large bowl, mix together the eggs, milk, butter, and vanilla until combined.
    3. Add the dry ingredients into the wet and stir until just combined. 
    4. Preheat the oven to the lowest setting with a cooling rack resting over a baking sheet. Grease a preheated waffle iron and pour about 1/3~1/2 cup of the batter into it. Close and cook to manufacturer's directions. Place the waffle on the cooling rack in the oven to stay warm while you cook the rest.
    5. Serve with banana caramel sauce (recipe follows), lightly sweetened whipped cream (to soft peaks), your favorite jam, pure maple syrup, apple butter, or fresh fruit.
    banana caramel sauce
    3 tablespoons butter
    1 tablespoon honey
    3 tablespoons light brown sugar
    3 bananas, peeled and sliced thick
    3 tablespoons heavy cream
    1. Melt the butter in a small sauce pan. Once melted, add the honey and sugar and stir to combine. Let the mixture simmer on medium-low until the sugar dissolves and starts to darken a little, 3~5 minutes. Add the heavy cream and bananas and stir until all of the banana slices are coated. Pour into your serving and let cool slightly before serving. (The starches from the banana will thicken the sauce as it cools so don't worry if it seems a little runny when you pour it out of the pan)