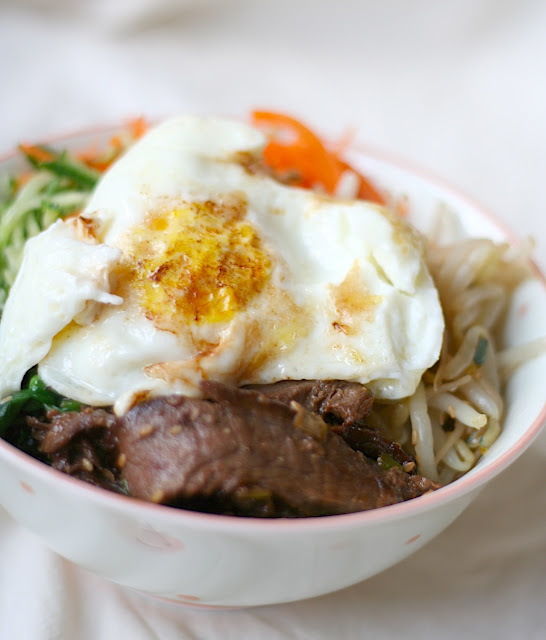
love. it.

You know when people ask you what your favorite food is and you just name something you really like because there's really no way you could come up with 1 thing you like to eat more than anything else? At least that's how I feel. But, most of the time, bi bim bop comes to mind. It's a Korean mixed rice dish that is so accessible and irresistable, and it's definitely one of my top 10. But not just any bi bim bop. Sometimes it can be really disappointing. It's taken me a long time to tweak the recipe enough to get to a point where I'm satisfied.
 See, when I was a kid, we lived close to a steak house. And I loved steak. So I would get a big steak and gorge myself. My mom, on the other hand, would always ALWAYS get the bi bim bop. And she always made the better choice. I pretty much always regretted my decision.
But years of going to Korean restaurants and being disappointed with really bland bi bim bop, I finally decided to roll up my sleeves and get to work on reliving my childhood memory of the dish sitting in front of my mom instead of myself that I always coveted. And I think I did it. It's full of flavor and textures and temperatures that just work so well together. It's a little labor intensive, but so worth the effort. Really. You gotta try it out.

Bi Bim Bop
serves 4
4 portions of cooked short grain rice

4 eggs
2~3 carrots, grated (lengthwise)
4 mini cucumbers, grated (lengthwise)

for the spinach:
1/2 lb baby spinach leaves, washed and dried
1/2 tablespoon sugar
1/2 tablespoon soy sauce

for the bean sprouts:
1 lb mung bean sprouts or soy bean sprouts
1 tablespoon soy sauce
1 tablespoon sesame oil
1 clove of garlic, grated
2 teaspoons sugar

for the beef: (bulgogi)
1 lb flank steak (is my favorite cut of meat for this, but you can definitely use something richer like ribeye or sirloin), frozen until mostly frozen, about half an hour, then sliced super thin, diagonally, against the grain
3 tablespoons sugar
1/4 cup to 1/2 cup soy sauce
2 cloves garlic, crushed
3 scallions, minced
5 tablespoons mirin
2 tablespoons sesame oil
2 tablespoons toasted, crushed sesame seeds
  1. For the beef: Combine all of the marinade for the beef together in a bowl until sugar is mostly dissolved. Add beef and let marinate for at least 10 minutes. Preheat a well oiled skillet or grill to high heat and cook the beef slices in a single layer in batches, making sure they get a good sear instead of steaming. Repeat with all batches, set aside.
  2. For the spinach: In a medium saucepan, bring about a 1/2 cup of lightly salted water to a simmer. Add the spinach, place the lid on top, and let steam for just a couple of minutes until the spinach wilts. Drain immediately and squeeze out as much excess liquid as you can. Add the sugar and soy sauce and toss to combine.
  3. For the bean sprouts: In a medium bowl, combine the soy sauce, sesame oil, garlic, and sugar until thoroughly encorporated. Fill a medium saucepan about halfway with water and bring to a boil. Add bean sprouts and let cook until slightly translucent but still crisp, about 2 minutes. Immediately drain and add to the bowl with soy sauce mixture. Toss to thoroughly combine.
  4. For the eggs: Either fry them over easy/over medium or scramble them and cook in a thin layer. Once the egg "pancake" is cooked and slightly cooled, slice thin to serve.
  5. To serve: Place one portion of rice in a medium serving bowl. Top with beef, bean sprouts, spinach, cucumber, and carrots in a circle. Top with the fried egg. (If making a scrambled egg pancake, put the egg in the surround circle and top with beef slices) Serve with kimchee and sriracha sauce.

cravings

I was reading through one of my cookbooks and found a recipe for a tuna and avocado bowl that sounded really appealing. Then I remembered what I always order when I go to Thaifoon for lunch. And then I couldn't stop thinking about it. I had fresh tuna steaks, so all I had to get were avocados. I took what I liked from both dishes and made my own version, which I absolutely loved. I think we'll be eating it a lot this Summer.
 This dish has just the right balance of fresh and rich and bright flavors. And fresh tuna is perfected in combination with fresh ginger. One of my favorite ingredients. Ever.
 And one major appealing part of this dish is that it takes about 5 minutes to put together. The tuna should definitely be served pretty rare, and other than the rice, that's the only thing that gets cooked. So cook your rice ahead of time, or you'll be sitting around waiting for it and picking at the succulent pieces of fish and avocado. Yum!

Tuna and Avocado Rice Bowl
serves 4
3 medium tuna steaks
3 avocados
canola oil
juice of 1/2 lime

for the dressing: (approximate measurements, adjust to taste)
toasted white sesame seeds
2 tablespoons soy sauce
1 tablespoon garlic infused olive oil, extra virgin olive oil, or sesame oil
1/2 tablespoon grated fresh ginger
juice of 1/2 lime
1/4 t sugar or honey
1 scallion, minced
  1. Season both sides of the tuna steaks with salt. Heat a tablespoon of canola oil in a large skillet over medium-high heat. Sear the tuna on one side, about 1.5 minutes. Flip over, and sear the other side. Remove from heat and let rest.
  2. Peel and dice the avocado into a 1 inch dice. Sprinkle with juice of half a lime.
  3. In a large bowl, whisk together all of the ingredients for the dressing. Add all of avocado and tuna and toss to combine. Serve over rice and garnish with more toasted sesame seeds.

pizza

On my old blog, I often talked about my favorite bread book.And unfortunately, since it's not my recipe, I can't share the recipe with you. (But like I've suggested over and over, go out and buy the book! It'll change your life, seriously) I love it. I don't buy bread anymore. And the amazing part is that this recipe is so versatile and stays in your fridge for up to 2 weeks, so I can make a fresh loaf of bread pretty much whenever I want.
Which is why pizza is a last minute, quick dinner at our house. And it's completely from scratch. If you don't have this book, (go out and buy it, or) you can use store bought pizza dough or any other pizza dough recipe, of course. But it won't be as convenient as what I do several times a month.
This week, I was feeling a bit splurgy and bought a bunch of fresh mozzarella (which someday soon I hope to make myself), so there was no question in my mind that I needed to make a Margherita pizza. It's the best way to use fresh mozzarella. It's the most beautiful, simple way to enjoy the creamy flavor. Pizza dough, fresh mozzarella, tomatoes, basil, olive oil. A teeny bit of salt to taste. I went one step further and infused my olive oil with garlic, just for more good flavor.
It might seem too simple, but sometimes simple is the best way to go. Just make sure you have the best quality ingredients available to you (& your budget), and you'll love the results. That's my whole theory about cooking from scratch anyway.

Margherita Pizza
makes an 8~10 inch pizza
1/4 lb (ish) pizza dough
a mixture of tomatoes, as much or as little as you want on your pizza (I used "campari" and "golden sweet cherries"), sliced
basil
fresh mozzarella slices
garlic infused olive oil*
kosher salt to taste
cornmeal
  1. Preheat your baking stone in the oven to 500°F (or higher, if your oven gets hotter). Using a paper towel, blot and press the tomato and mozzarella slices to remove excess moisture.
  2. Roll the dough out as thin as you can without tearing, about 8~10 inches in diameter. Place on a (generously) cornmeal coated pizza peel, and work quickly.
  3. Evenly place slices of mozzarella cheese, avoiding the outer inch of the dough to prevent the cheese from melting and sliding off of the dough. Place slices of tomato on top, then drizzle with garlic infused olive oil. Sprinkle lightly with salt, then quickly slide the pizza onto the stone with a quick, thrusting motion. Bake in the oven for 10~12 minutes, until the cheese and tomatoes are browned and the crust is crisp. Let cool slightly before serving.
Garlic Infused Olive Oil
 1/2 cup good extra virgin olive oil
3~6 garlic cloves, peeled and crushed
  1. In a medium saucepan, pour the olive oil and add the crushed garlic cloves. Heat over medium-low heat. If the garlic begins to brown, turn the heat down. Let the flavors steep for at least 10 minutes, but the longer you go, the more flavor you get. But make sure the garlic doesn't brown or you'll get a bitter oil and lose the olive flavor.

chicken

Once in a while, I crave a garlicky, lemony roasted chicken. With roasted potatoes, homemade rolls, and some kind of green vegetable. Like broccoli or asparagus. Or some sautéed leafy greens. But midweek, I don't have time to invest into a roasted chicken, or homemade rolls. And with 2 little kids and a dog running around, it's a major health hazard to pull out a whole raw chicken, not knowing what adventure will be waiting around the corner for me.
... But I wanted chicken tonight. A good one. I had bought some cute little new potatoes and broccoli rabe, and they screamed out to me for a juicy, whole bird. So I spatchcocked it. Now, before you gasp, let me inform you that this is a specific term used for chicken or other small birds, when using a similar technique to butteryflying. It makes cooking the whole bird in a shorter amount of time possible. And you still get a crispy skin and juicy, flavorful interior.
But, I have a confession. I hate working with poultry. The whole cross-contamination thing really makes me nervous, and I get a little obsessive with the clorox wipes on EVERY surface of my kitchen following any touching of it. And if you're like me, cutting through chicken ribs with your kitchen shears may take some getting used to. So brace yourself, and get to it! It's a pretty fabulous result, so it'll be worth it.

weeknight whole chicken dinner
serves 4~6
chicken:
1 whole chicken
1 head of garlic, peeled, cloves left whole
1 lemon, sliced
salt and pepper to season
  1. Pat the chicken dry. Place the whole chicken on a cutting board with the breast side down. Starting at the opening of the cavity, take some sharp kitchen shears and cut through along the right side of the spine. Do the same with the left. Flip the chicken over and press firmly down on the center of the bird to flatten. Often, you'll feel the breast bone break. (That's a good thing) Season the chicken with salt and pepper.
  2. Heat a large lidded skillet or sauté pan over medium-high heat. Pour about 1 tablespoon canola oil (or other high-smoke point, neutral flavored oil) into the bottom of the pan. Place chicken in the pan skin-side down. Once you get a good sear, add the garlic cloves and lemon slices and place the lid on. Turn the heat down to medium, and let cook through. If the skin is burning before the meat is cooked through, add a little water or chicken stock to create some steam. Using an instant-read thermometer, check the temperature of the meat in the thickest part of the thigh (I always check the thigh and the breast), avoiding the bone. It should reach 165°F.
  3. Serve with browned side up.
potatoes:
28 oz (that was the size of the bag I got, but anywhere between 24~32 oz would work) variety of new potatoes, scrubbed and trimmed
6 shallots, peeled, tops and bottoms trimmed, and cut in half (pole-to-pole)
1 sprig rosemary
1 T butter
salt and pepper to taste
  1. In a heavy bottom, large skillet, heat 1 tablespoon of oil over medium-high heat. Place shallots and potatoes, rosemary, and salt and pepper. Toss to coat. Let cook, tossing occasionally, until the potato skins start to wrinkle and brown and the shallots caramelize. 
  2. Add 2~3 tablespoons of water and place the lid on top until potatoes are cooked through. Once cooked through, remove lid and cook until water is all evaporated. Add butter and swirl to coat. Remove rosemary stem. Serve immediately.
broccoli rabe:
1 bunch broccoli rabe, broccolini, baby broccoli (whatever you want to call it)
olive oil
salt to taste
  1. Preheat the oven to 400°F. Trim bottom 1/2~1 inch of stems. In a large bowl, toss the broccoli rabe, salt, and olive oil.
  2. On a baking sheet, place an single layer of the broccoli rabe. Roast in the oven until the tips get crispy and the stems are tender crisp, about 15 minutes.

science experiment

When I was little, my parents took us to this Italian restaurant in Tokyo once in a while. I don't remember much from it except the warm, quaint ambiance and a couple of items off of the menu. My sister always got the fresh papardelle with tomato cream sauce and I always got the spinach fettuccine with salmon cream sauce. And for some reason, though I've successfully recreated the papardelle as best as my childhood memory will let me, I've never attempted the spinach fettuccine with salmon. I'm not sure why. So finally, after writing about homemade pasta last week, I decided it was definitely time.
Here's the thing about spinach pasta. It can be done 2 ways. You can just chop up some spinach and add it into your pasta dough, but that'll add unneccesary water from the spinach, and can possibly result in the wrong texture. As well as a not-so-smooth color. The other way is to extract the chlorophyll from the leaves themselves, which results in a more cohesive color, and doesn't change the texture of the pasta. (But then it's not really "spinach" pasta anymore, it's more just a natural green pasta. You can use any dark, leafy greens for this) So I decided to go the hard route. Just to see if I could.

When I was talking to my sister about this method last week, she joked and said it sounds like a science experiment. And it does, doesn't it? But I guess a lot of cooking is a bit of an experiment. But it made me feel cool that I learned a cooking method that involves the word "extract". There's something so advanced about that. Though I am no where near advanced.
 
Now, it is a little labor intensive. But so worth it! The resulting color is so spectacular! And tossed with salmon gently poached in a rich milky-cream sauce, you just can't go wrong ... Well, unless you're eating like this everyday. Don't be deceived by the health benefits of the salmon and spinach here, folks. This is not a healthy dish. But for a special occasion, PLEASE try it. It'll change your life:)
As for the salmon, try to find the thicker fillets. As opposed to the thin, triangular shaped fillets, which as a less desired cut of the fish. The thin fillets come from the tail end and cook too fast to be poached well. The thicker fillets tend to have more fat marbled in (and fat=flavor), are easier to skin (if you get them skin-on), and cook more evenly. Of course, if you don't live in the Pacific Northwest where you can get the best salmon, there might be slim pickings. Like where I am in the midwest. Ah, how I long for Portland salmon. So you Oregonians reading this, please buy good salmon for the rest of us. Make this for a special occasion and splurge a little on the fish. You'll be so glad you did.

And I'll be jealous you did. My mouth is watering just thinking about it.

How to extract chlorophyll from leafy greens to make pasta
from Essentials of Cooking by James Peterson
ingredients:
1/2 lb spinach (or other leafy greens) leaves, cleaned and stems removed
cold water

equipment:
blender
medium sauce pan
fine mesh strainer (or a medium mesh strainer with cheese cloth)
ladle
  1. Place the leaves in the blender. Pour enough water to go half way up the leaves. Purée for about a minute, until it becomes mostly smooth, like a soup.
  2. Strain the purée in a fine mesh strainer, letting the reserved green liquid drain into a heavy-bottom medium saucepan. Gently press down on the solids with the back of a lade to get as much liquid out as you can. You can discard the solids. (Or use them in something else like spinach hummus. Yum!)
  3. Heat the reserved liquid over medium heat until floating green clumps appear. Drain immediately through a fine mesh strainer. This time, don't press down on the solids and be patient. The green paste in the strainer is the chlorophyll. Use the chlorophyll within 2 days or transfer it to a small jar and cover its surface with olive oil. Store in the fridge for a few weeks.
Add extracted chlorophyll to food processor bowl with the eggs in step 1 of my favorite fresh pasta recipe.

Fresh Spinach Fettuccine with Salmon Cream sauce
4 portions of center-cut salmon fillet. Skinned, patted dry, cut into 1 inch cubes, and sprinkled generously with kosher salt
1 recipe spinach fettuccine
1/2 cup heavy cream
1/2 cup whole milk
1 garlic clove, sliced very thin
  1. In a deep sauté pan, heat the cream, milk, and garlic over medium-low heat, stirring occasionally. Once it comes to a simmer, turn the heat off, add the salmon, and cover. Meanwhile, Cook the pasta to al dente.
  2. The salmon will cook quickly, so keep an eye on it. Once it's barely cooked through, about 3~5 minutes, toss with the pasta and serve immediately. 
And since I trust Scott Conant when it comes to pasta, and he says you don't ever put cheese on a fish dish, I don't recommend doing that.