long absence/birthday treat

Wow, it's really been almost 3 months since my last post. I have a reasonable explanation for all of this. I haven't really been in the kitchen too much these last 2 months. Mainly because I haven't been in the mood for food. What?! Is that even physically or emotionally possible for Lillian? It is, in only once instance. And that is during the first trimester of pregnancy. And now that I'm over that hurdle, I've been cooking again, and it's been wonderful! I forgot how much I love the taste of taste. We're having a boy, by the way! And we're all so thrilled.

About a month ago, we celebrated my husband's 29th birthday. And to my surprise, he asked for a lemon tart for his birthday dessert. Usually he asks for the cloyingly sweet, as much sugar in the form of caramel as possible desserts, but this time he wanted one of the few things my poor pregnant taste buds could stomach. LEMON! (come to think of it, maybe he was just being nice ...) And this tart, my friends, is as lemony as they come. And I was in heaven eating it.
Of course the key to a good lemon tart is the lemons. If you like a sweeter, rounder flavor, try it with meyer lemons. They are fantastic and tangeriney lemons. (Because they're actually a cross between tangerines and lemons) Ooooh, or even limes, if you want that slightly bitter aftertaste without sacrificing that bright citrusy punch. Yum! I even had a dream last night to use yuzu juice. Wow, what would that be like? I think I might have to try it now. A beautiful, delicate Japanese take on a French pastry. Whatever you do, use fresh fruit. This is not an appropriate application for pasteurized, bottled juice. I know I sound like a snob, but I promise it makes a big difference. Take the time to squeeze for yourself!
Lemon tart (from America's Test Kitchen)
makes 1 9-inch tart

for the crust: (this is a traditional tart crust, much crisper and less flaky than a pie crust)
1 large egg yolk
1 tablespoon heavy cream
1/2 teaspoon vanilla extract
1 1/4 cups all purpose flour
2/3 cups confectioner's sugar
1/4 teaspoon fine salt
8 tablespoons (1 stick) unsalted butter, cut into 1/4 inch pieces and chilled

  1. In a small bowl whisk together the egg yolk, cream, and vanilla extract. Process the four, sugar, and salt in the bowl of a food processor to aerate. Scatter the chilled butter pieces over the top and pulse until the mixture resembles coarse cornmeal, about 15~20 pulses.
  2. With the motor running, pour the egg mixture into the food processor through the feed tube until the dough just comes together around the blade.
  3. Turn the dough out onto a sheet of plastic wrap and flatten into a 6-inch disk. Wrap tightly and chill in the refrigerator for 1 hour. Before rolling out the dough, let it sit on the counter to soften just slightly, about 10 minutes.
  4. Roll the dough out to an 11-inch circle on a lightly floured surface and place it into a 9 inch tart pan. Make sure not to stretch the dough when fitting it into the pan.Set the tart pan on a large plate and freeze for 30 minutes.
  5. Adjust an oven rack to the middle position and preheat the oven to 375°F. Se the tart pan on a large baking sheet and press a layer of parchment paper and then foil into the tart shell over the edges of the pan and fill with pie weights. Bake until the tart shell is golden brown and set, about 30 minutes, rotating halfway through baking.
  6. Carefully remove pie weights and foil and continue baking the shell until it is fully baked and golden, about 10 minute longer. Transfer the baking sheet to a wire rack and let the shell cool slightly while making the lemon curd filling.

for the filling:
7 large egg yolks
2 large eggs
1 cup granulated sugar
2/3 cup fresh lemon juice (about 4 lemons)
pinch of salt
4 tablespoons (1/2 stick) unsalted butter, cut into 4 pieces
3 tablespoons heavy cream, chilled

  1. Whisk the egg yolks and eggs together in a medium saucepan. Whisk in the sugar until combined, then whisk in the lemon zest, lemon juice, and salt. Add the butter and cook over medium-low heat, stirring constantly, until the mixture thickens slightly and registers 170°F, about 5 minutes. Immediately pour the mixture through a fine-mesh strainer into a bowl and stir in the cream.
  2. Pour the lemon filling into the warm tart shell. Bake the tart on the baking sheet until the filling is shiny and opaque and the center jiggles slightly when shaken, 10 to 15 minutes. Let the tart cool completely on the baking sheet, about 1.5 hours.
  3. To serve, carefully remove the outer ring of the tart pan, then slide a thin metal spatula between the crust and the bottom of the pan and slide the tart onto a serving platter or cutting board. Serve plain, dusted with confectioner's sugar, or with some very lightly whipped (soft peaks) cream and fresh fruit.

my kind of comfort food

I love mushrooms. LOVE. And my favorite kind is probably shiitake mushrooms. They have so much depth of flavor, and are so versitile. And though I always grew up eating them in only Japanese dishes, I love how they work in other genres.
There's a guy I go to every week at our local farmers market who grows shiitakes in tree trunks that he's predrilled. He leaves one tree trunk out for display, and the very last customer of the day gets the ones he picks from the display trunk--the freshest mushrooms of the day. It's beautiful and fascinating. And he sells out every Saturday by 10 am. So the mornings I'm running late, I've been pretty close to not getting what I want. But one time I got lucky and got a 1/2 lb from his display.

I've used these mushrooms for all sorts of dishes, but I think my favorite is to show off their earthy flavor in a creamy mushroom pasta. This sauce goes well with long or short pastas, but for some reason I think rigatoni works best.
It's so easy to alter this recipe. Sometimes I add baby spinach right at the end so it barely wilts, sometimes I add fresh basil, but my favorite sprinkle of green comes from the grassy, bright flavor of minced flat leaf parsley. But experiment and decide for yourself what you like.


pâtes à la crème et aux champignons
or "pasta with cream and mushrooms" (just wanted to sound fancy with the French)
1/2 lb fresh shiitake mushrooms, scrubbed clean, stems removed, and caps sliced 1/4 inch thick
1 tablespoon butter
1/2 cup heavy cream
1/4~1/2 cup combination of parmiggiano reggiano and gruyere cheeses, grated
1 tablespoon fresh flat leaf parsley, minced
salt and pepper to taste
1 lb pasta
  1. In a large saute pan, melt 1/2 tablespoon of the butter. Add enough mushrooms to just cover the bottom of the pan without overlapping. Season the mushrooms with salt and pepper and brown the mushrooms. Toss to saute both sides of the mushrooms and set aside. Repeat with remaining butter and mushrooms.
  2. Meanwhile, bring a large pot of water to a boil. Season the water with 1 tablespoon of kosher salt and cook pasta to al dente, reserving 1/2 cup of pasta water. 
  3. Once the mushrooms are cooked, add all of them back to pan. Add cream and cheeses, and stir gently until cheese is completely melted. 
  4. Add pasta and parsley and toss to coat. Add pasta water a little bit at a time to loosen the sauce if necessary. Serve immediately.

    from MY garden

    I can't believe it. I have a real garden. I have plants that are growing and I'm literally eating the fruits of my labors. I made salsa with home grown tomatoes for dinner tonight! And the other day we had norimaki with my own home grown mizuna (a leafy green, part of the mustard family, used often in Japan). I LOVE SUMMER! And even if I complain a lot about the humidity here, if it means even I can grow a garden, I think I can appreciate it:)

    japanese series part 3

    Ah, the farmer's market. I love walking around with my family and being inspired by what's available each week. Most weeks I buy some shiitake mushrooms and eggplant first, and then wander. And when it comes to eggplant, I'm generally drawn to Japanese eggplant. But this week I was inspired by this beautiful variety of baby eggplant.
    With such beautiful, delicate little eggplant, I wanted to showcase their texture and flavor by keeping it simple. My favorite way to eat eggplant is with a simple ginger and soy sauce dressing. Because this recipe only has 3 ingredients, it's really important to start with quality ingredients. Avoid soy sauce with added ingredients like sugar, and don't use dried ginger. Ginger is a lot easier to grate if it's frozen, and because it spoils quickly, I keep mine in the freezer all the time. And if you can find Japanese eggplant, do a little happy dance and buy it. You'll probably have to go to an Asian market to find it, unless you have an impressively stocked grocery store. Your typical globe eggplant is a little too bitter for this recipe.

    When it comes to cooking it through, there really aren't any short cuts. A properly cooked eggplant is buttery and rich, an undercooked eggplant is spongy and bitter. Don't be impatient. Trust me, I've made this mistake;)

    fresh ginger eggplant
    serves 4 as a side dish
    8~12 small eggplant
    1 teaspoon freshly grated ginger
    1 tablespoon good quality soy sauce
    neutral tasting oil for frying

    1. Clean eggplant, cut off the tops, and cut each eggplant in half lengthwise. In a small bowl, combine the ginger and soy sauce.
    2. Heave a large skillet, grill pan, or on a grill, to medium heat. Brush the cut side of the eggplant with the oil. Arrange the eggplant, cut side down, in a single layer on the skillet. If it doesn't fit, do it in batches. Cover, and let it cook through. The skin will wrinkle a little and the flesh will be tender all the way through.
    3. Place the eggplant cut side up on a serving platter, and drizzle the soy sauce/ginger mixture over the top and serve.

    secret ingredient

    I started college during Summer term back in 2002, about a week after I graduated from high school. That very first semester in college, I had a roommate from Mexico. She was one of the kindest, most sincerely generous people I've ever met. There were 6 of us girls in the same apartment, and she was basically our mommy. And she showed her love through food. That was one thing I loved about her. Not only because I got to eat that delicious food, but because she really put so much of herself into it. She had such a passion for the food and for the people she was serving it to. And whenever people talk about love being the secret ingredient in good food, I think of Alejandra. She did just that.
    She inspired my obsession with cilantro, admittedly and ingredient I had never used before I met her. I'd eaten it, but definitely had never purchased it. And now, I can't live without it. I grow it in my garden, and still have to buy more at the store by mid-Summer. And thanks to her, I can make a mean salsa. Still somehow not as good as when she made it, but it's still pretty darn good. And I always have to credit her.
    I've made a few alterations since, and let me tell you why. It's not out of disrespect, I promise. They are by no means improvements, just alterations. That's the beauty of this recipe. It's SO versatile. She always made it with avocados, but they can very easily be omitted for a simple fresh salsa. My sister once added fresh sautéed corn and black beans, and it was AMAZING.
     But then, several years after I lost touch with Alejandra, the choir I was a part of got to travel to San Antonio, Texas. The heart of Tex Mex. I know, I know, I shouldn't mix the two. Alejandra made Mexican food, Tex Mex is it's own beautiful thing. And mixing Asian food is so not my thing, so I realize I'm being a complete hypocrite. But when you learn what I learned, I think you'll forgive me. My friend who is a total foodie and also a member of my choir went to a restaurant that I missed out on. He said their salsa was just like mine, but added the juice of 1/4 of an orange to it also. I was so curious that I had to try it. And there was no turning back. That tiny bit of sweet acidity added to the lime is a miracle!
    And so, out of respect for Alejandra, there is no substitute for her secret ingredient, but I found one that made me feel a little closer to the perfect flavor she got out of her ingredients.

    basic secret ingredient salsa
    juice of 1~2 limes, depending on acidity and juiciness of the limes
    juice of 1/4 navel orange, again depending on the juiciness of that particular orange
    2 lbs sweet, quality tomatoes, diced (this time I used a combination of red and yellow cherry tomatoes)
    1 bunch cilantro, chopped very fine
    1/2 vidalia onion, diced small (or for color I'll use a red onion. But make sure you chop it ahead and soak it in cold water, replacing the water 2~3 times, for at least 30 minutes, to remove that pungent raw onion flavor)
    kosher salt to taste

    1. combine all ingredients into bowl. Season with salt to taste.
    variation additions:
    1 can black beans, drained and rinsed
    1 1/2 cups fresh sauteed corn
    2~3 large hass avocadoes, diced

    plain and simple

    My mom often says, "simple is best." And as a teenager, I remember being a little annoyed with her mantras that she would enthusiastically repeat, but this one I agree with.
    And though when it comes to my kitchen equipment addiction I may not be the poster child of simplicity, when it comes to the cooking itself, I try to emulate this idea. I really believe in appreciating the flavors of each ingredient. I had a new friend over for dinner tonight, and she paid me the highest compliment I've ever received--or desired to receive. She took a bite and said she's never eaten spaghetti and meatballs with so much flavor. Now, I promise you I don't have the best spaghetti and meatballs recipe out there. No way I can out-cook a real Italian grandma. Not even close. But she got exactly what my passion for food is all about. Flavor. REAL flavor. And it was really exciting to have someone get my food philosophy in one bite.
    So I was inspired to share with you my absolute favorite way to cook asparagus. It makes the asparagus taste like ... asparagus! No hiding or altering or adding. I want to highlight that grassy, earthy, almost bitter but somehow sweet, complex flavor that only asparagus has. And I think the best way to do that is by roasting it. And the ingredient list is short. Asparagus, good quality olive oil, salt and pepper. And if you've never tried it, it'll change your life.

    Roasted Asparagus
    2 1/2 lbs fresh asparagus
    2 tablespoons good quality olive oil
    salt and pepper to taste

    1. Preheat the oven to 400°F.
    2. Hold one spear of asparagus by the end and about the middle and bend it until it snaps. Cut all spears about the length that it naturally broke at. Peel the bottom inch or so.
    3. Place the trimmed and peeled asparagus spears on a rimmed baking sheet in a single layer. Drizzle with olive oil and sprinkle with salt and pepper. Toss to coat. Place in the preheated oven and bake for about 15 minutes, until tips are crisp and stalks are browned. Serve warm.

    makes me so happy

    The farmer's market here in Bloomington, IN is in full bloom now, and I might be the happiest person. I look forward to Saturday mornings. I always go to the same guy in the back corner that sells the best shiitake mushrooms I've ever tasted (outside of Japan, of course;)), and then as a family we paruse the beautiful colors and smells and buy what inspires us. My kids always ask for some peaches, and how can I deny them? This week, I bought these gorgeous string beans, purple and green.
    I've made hoisin string beans, and plain old blanched beans with garlic butter. My 2 favorite ways to eat them.

    My own garden is actually growing this year, too! I have heirloom beefsteak tomatoes that are till green, but getting bigger and more asymmetrical everyday, and I can't wait to make some big, fat sandwiches with on some crusty bread with plenty of Japanese mayo. And tonight, I used my own home grown rosemary, parsely, and basil in spaghetti and meatballs.

    I love Summer. All of this produce is so inspiring! What's your favorite fresh vegetable or fruit to eat and cook with in the Summer?

    japanese series part 2

    As promised, I'm writing about Japanese food again. And since I started with the basic dashi, we're going to make the dish I use dashi for the most, miso shiru--or miso soup. There are so many ways you can alter this soup, but the basic of the basic miso soup has 5 ingredients: dashi, miso, scallions, wakame, and tofu.

    Don't let the exotic ingredient list scare you too much. Dashi you know how to make, miso is easy to find in the refrigerated section of any Asian market, and tofu you can find at any grocery store these days. Though I do prefer the silken tofu (House is my favorite brand you can buy in the US) you find at Asian markets to the kind you can buy at grocery stores. And I'm not saying that to be snobby. It really is just my personal preference. But when I'm too lazy to make my own tofu or to head to the Asian market, medium or firm tofu at the grocery store works great.
    miso
    Miso is a prepared soy bean paste. It's earthy and salty, and when diluted in dashi, makes ... heaven. It's rich and light at the same time. I don't know how else to explain it. It comes in a variety of styles, but the most common are red and white. And you can buy them mixed together, which I find more versitile. But it's personal preference so get whichever you like and fits into your budget and palate.

    Miso wasn't a flavor I was fond of as a kid. I know, you're thinking I'm so not Japanese, right? I've learned to love it as an adult, and I rarely go a week without it. It's my favorite.
    wakame
    Wakame is a specific type of seaweed. It's sold dried, sometimes in long strands and sometimes cut. I prefer the cut kind. I just reconstitute it right in the serving bowl. It happens really fast, so it's just easier for me that way. If you let it sit too long in liquid it can get slimy, which is probably what most people who don't like it have experieneced. When newly reconstituted, it's slippery but not slimy, and tastes like the ocean. A clean ocean. Not a stinky, fishy-smelling one.

    This might be the hardest ingredient for you to find. It's with all of the other seaweeds, and you might just have to ask for help or go to an online source. If seaweed isn't your thing (though eventually I think you should give it a shot), substitute baby spinach.

    miso soup
    serves 4
    1/4 block of tofu, cut into 1/2 inch cubes
    2 teaspoons dried, cut wakame
    2 scallions, sliced very thin
    6 cups dashi
    1.5 tablespoons red or white miso (or a combination of both)

    1. In a small sauce pan, heat the dashi. Add the miso, and stir in to combine until completely dissolved. Add the tofu just to heat it through.
    2. In the small serving bowls, equally distribute the wakame. Pour the hot miso broth over the wakame, and equally distribute the tofu. Garnish with the scallion. Serve hot along side rice.

    creamy goodness

    Recently for a lunch group I'm a part of, our theme was appetizers. On the morning of, I couldn't think of what to bring, but I had lots of bread dough, whole milk, and heavy cream in the fridge. So I made baguettes into crostini and home made ricotta cheese. It was really good, but definitely an indulgence. I sure felt it on my hips the next day.
     Remember when curdling the cheese to use an acid with light color and one that you like the flavor of. Your cheese will take on the flavor of the acid a little bit. I used a combination of white balsamic vinegar and lemon juice.
     True ricotta cheese is traditionally made from the leftover whey of other cheeses, in an effort to not waste it. Unfortunatley, though, this whey has to be used within an hour or so of making the other cheese, so unless you often make your own parmesan, you're probably not going to have any fresh whey on hand. Making it with milk and cream is a wonderful alternative, and results in a very creamy ricotta.

    Homemade ricotta cheese
    makes about 2 cups
    5 cups whole milk
    1 cups heavy cream
    1 teaspoon kosher salt
    1/4 cup lemon juice, white wine vinegar, white balsamic vinegar, or other light colored acid that you like
    1. Set a large sieve or colander over a large bowl or clean food grade bucket. Dampen a large sheet of cheesecloth or butter muslin and lay it evenly in the colander.
    2. In a large stainless steel or enameled cast iron pot, combine the milk, cream, and salt. Bring the mixture to a boil and take off of the heat. Immediately add the acid and gently give it a stir. Allow the mixture to sit for about 1 minute to curdle.
    3. Carefully pour the mixture into the cheesecloth-lined colander. Let it drain for about 30 minutes. The longer you let it drain, the thicker the ricotta will be. Store in the refrigerator for up to 5 days.
    *if you want to make a lower fat version, I don't recommend using less than 2% milk. Even the 2% milk ricotta won't make a creamy, smooth cheese. It will be much more rubbery, and you won't want to strain it as long because the curds and whey will separate immediately. So, the first time you try it, stick with this recipe and alter as you get used to it.

    crostini
    makes about 24 crostini

    1 baguette
    1~2 cloves garlic
    extra virgin olive oil
    salt *optional
    1. Preheat the oven to 350°F. Slice the baguettes 1/2 inch thick at a diagonal. Lay them in a single layer on a large rimmed baking sheet. Brush lightly with olive oil. Bake in the oven until crisp, about 8~10 minutes, flipping them over once during baking.
    2. Rub each slice with the garlic clove and sprinkle lightly with salt, if using. Serve with bruschetta, cheese, tapenade, or any other savory spread or topping. These can be served warm or at room temperature. If not using immediately, let cool completely and put them in an airtight bag. Use withing 2 days.

    let's start with the basics

    I've had a lot of people ask me about Japanese food lately. And I wish I could have all of you meet my family in Japan. It'll change your life. Healthy food is their cultural lifestyle, not something they're deliberately doing. And guess what! It's delicious! So I want to do a series for you. And we're starting with the basic of basics in Japanese cooking. Dashi. (pronounced "dah-shee" ... sort of. That's the best I can do without actually saying it for you)
     Dashi is a Japanese stock made with dried bonito flakes, kombu kelp, and water. And really, don't let the ingredient list scare you. You can find these ingredients really easily in any Asian market, and I promise they aren't fishy or scary or as unappetizing as you might think. In fact, the term "umami" was created because of this very basic Japanese dish. It was delicious enough to earn a 5th taste:)

    I use dashi as a base for soup or just to simmer something in--every time we have Japanese food for dinner. So I thought it was a good place to start.
    There are 2 stages of dashi you can get out of one set of ingredients. You can make the "first" dashi, which is more pure and has the best flavor. I set that aside for more delicate dishes like clear soups and simple simmered dishes that rely heavily on the clean flavor of the dashi. The "second" dashi is when you use the same amount of water with the already used, strained bonito flakes and kombu. This is what I use for miso soup and less delicate dishes.

    basic dashi
    makes about 4 cups (8 cups if you make second dashi)

    4 1/2 cups water (another 4 1/2 cups for second dashi)
    2 cups dried bonito flakes
    1 4x4 inch (or smaller, if you like a lighter flavor) sheet of kombu
    1. for first dashi: Fill a medium saucepan with 4 1/2 cups water. Add the kombu. (do not wipe off or rinse off the white powder, this is where all the extra nutrition is!) Heat over high heat until the water almost reaches a boil. remove the kombu and add the bonito flakes. Bring the liquid to a boil and immediately strain the bonito flakes with a fine mesh sieve. Store in the refrigerator for up to 2 days, or freeze in small portions.
    2. for second dashi: Add the bonito flakes and kombu back into the saucepan. Add 4 1/2 cups water and bring to a boil. Reduce heat to low and let simmer for 10 minutes. Strain and discard the solids. Store in the refrigerator for up to 2 days or freeze in small portions.

    to health

    The mister and I have been talking a lot about health lately. We've made a lot of changes to our lifestyle in the few years we've been married, which I think have improved our health a lot, but we can definitely do better. I often make a 100% whole grain brown rice loaf from the sequel to my favorite bread book, because it really is delicious and you feel so good eating it. I had some dough and a bunch of produce in my fridge, so I decided to make a fresh, light, healthy pizza. And it was awesome! The dough crisped up just right, and the veggies charred just right in the super hot oven. And I felt good eating it. And the best part was that it was delicious. What's the point in healthy food if it isn't good to eat, right? I loved that you could see everything that was on there. Of course with my almost 3 year old, it meant she could pick off what she didn't want, but she actually ate most of it because I let her help me put the toppings on.
    It was so tasty, in fact, that I invited my health-foodie friend Melissa over for lunch a few days later and made it again. We had a lot of fun changing up flavors and textures. I'm in love.
    I used pecorino romano cheese because you get so much flavor in just a little bit, and since I was going for a healthy pizza, I didn't want to be weighed down by cheese.
    For longer cooking vegetables like eggplant and super water-logged vegetables like mushrooms, please take the time the sauté them ahead of time. (I used Japanese eggplant and plain old white button mushrooms, but any eggplant or mushroom varieties would be delicious!) Otherwise your eggplant will be spongy instead of buttery, and your mushrooms will release a puddle of water on top of your pizza. And when sautéeing mushrooms, do it in batches. There should always be enough room for the mushroom slices to be in a single layer in your pan or they will not brown, they will steam. And you want a little caramelization. Mmmm.

    Please keep in mind that this is a VERY flexible recipe. Whatever looks good at your farmer's market or local grocer's produce section is what you should use. If your shallots are smushy but the red onions are firm and glossy and perfect, go with the onions. If the spinach is wilty but the arugula looks perky, go with the arugula! Or skip it all together. Pick what looks fresh and entices you. And have fun doing it.

    Weeknight healthy pizza
    makes 2 10~12 inch pizzas
     1/2 lb fresh whole wheat pizza dough (if you need ideas on where to go for a good pizza dough recipe, email me. I will hook you up)

    1 Japanese eggplant (or 1/3 medium globe eggplant), diced small and sautéed
    4 ounced white button mushrooms, sliced and sautéed until golden brown
    1 bunch broccoli rabe or broccoli, trimmed, (in the case of broccoli, stems removed), and sautéed lighty, if desired
    handful of baby spinach leaves, torn into little pieces
    2 shallots, sliced VERY thin
    1/4 c pecorino romano cheese, grated
    10~15 cherry (or grape) tomatoes,  cut in half
    2~3 small sweet tomatoes, sliced thin and pulp and seeds removed
    any other veggies you like:)
    garlic infused olive oil
    fresh herbs such as parsley and basil

    for the sauce:
    10~12 sweet tomatoes, quartered
    2 cloves garlic, grated or minced
    1 tablespoon olive oil
    salt to taste
    1. Heat a small saucepan over medium heat. Add the olive oil and garlic for the sauce, and cook until garlic is fragrant. Add tomatoes. Cook, stirring often until tomatoes break down and thicken. Add salt to taste. Set aside.
    2. Preheat the oven (with a pizza stone or upside down cookie sheet) to 500°F. Cut the pizza dough in half and roll out as thin as you can without tearing. Place gently on a pizza peel prepared with cornmeal. Spread on about 3 tablespoons of the tomato sauce, sprinkle about 2 tablespoons of cheese, then add whatever vegetables you like. Add tomatoes and shallots last to ensure good caramelization. Quickly slide pizza off of the pizza peel onto the stone and bake for about 10 minutes, or when crust is crisp and vegetables are browned. Add fresh herbs. Repeat with second pizza. Let cool slightly before serving.

    love. it.

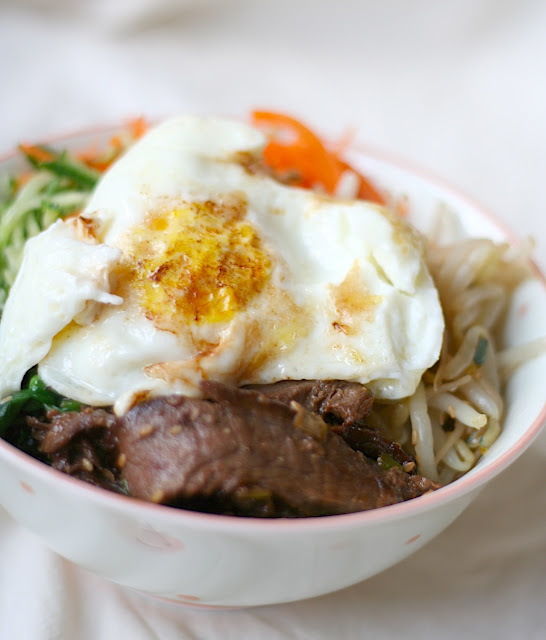
    You know when people ask you what your favorite food is and you just name something you really like because there's really no way you could come up with 1 thing you like to eat more than anything else? At least that's how I feel. But, most of the time, bi bim bop comes to mind. It's a Korean mixed rice dish that is so accessible and irresistable, and it's definitely one of my top 10. But not just any bi bim bop. Sometimes it can be really disappointing. It's taken me a long time to tweak the recipe enough to get to a point where I'm satisfied.
     See, when I was a kid, we lived close to a steak house. And I loved steak. So I would get a big steak and gorge myself. My mom, on the other hand, would always ALWAYS get the bi bim bop. And she always made the better choice. I pretty much always regretted my decision.
    But years of going to Korean restaurants and being disappointed with really bland bi bim bop, I finally decided to roll up my sleeves and get to work on reliving my childhood memory of the dish sitting in front of my mom instead of myself that I always coveted. And I think I did it. It's full of flavor and textures and temperatures that just work so well together. It's a little labor intensive, but so worth the effort. Really. You gotta try it out.

    Bi Bim Bop
    serves 4
    4 portions of cooked short grain rice

    4 eggs
    2~3 carrots, grated (lengthwise)
    4 mini cucumbers, grated (lengthwise)

    for the spinach:
    1/2 lb baby spinach leaves, washed and dried
    1/2 tablespoon sugar
    1/2 tablespoon soy sauce

    for the bean sprouts:
    1 lb mung bean sprouts or soy bean sprouts
    1 tablespoon soy sauce
    1 tablespoon sesame oil
    1 clove of garlic, grated
    2 teaspoons sugar

    for the beef: (bulgogi)
    1 lb flank steak (is my favorite cut of meat for this, but you can definitely use something richer like ribeye or sirloin), frozen until mostly frozen, about half an hour, then sliced super thin, diagonally, against the grain
    3 tablespoons sugar
    1/4 cup to 1/2 cup soy sauce
    2 cloves garlic, crushed
    3 scallions, minced
    5 tablespoons mirin
    2 tablespoons sesame oil
    2 tablespoons toasted, crushed sesame seeds
    1. For the beef: Combine all of the marinade for the beef together in a bowl until sugar is mostly dissolved. Add beef and let marinate for at least 10 minutes. Preheat a well oiled skillet or grill to high heat and cook the beef slices in a single layer in batches, making sure they get a good sear instead of steaming. Repeat with all batches, set aside.
    2. For the spinach: In a medium saucepan, bring about a 1/2 cup of lightly salted water to a simmer. Add the spinach, place the lid on top, and let steam for just a couple of minutes until the spinach wilts. Drain immediately and squeeze out as much excess liquid as you can. Add the sugar and soy sauce and toss to combine.
    3. For the bean sprouts: In a medium bowl, combine the soy sauce, sesame oil, garlic, and sugar until thoroughly encorporated. Fill a medium saucepan about halfway with water and bring to a boil. Add bean sprouts and let cook until slightly translucent but still crisp, about 2 minutes. Immediately drain and add to the bowl with soy sauce mixture. Toss to thoroughly combine.
    4. For the eggs: Either fry them over easy/over medium or scramble them and cook in a thin layer. Once the egg "pancake" is cooked and slightly cooled, slice thin to serve.
    5. To serve: Place one portion of rice in a medium serving bowl. Top with beef, bean sprouts, spinach, cucumber, and carrots in a circle. Top with the fried egg. (If making a scrambled egg pancake, put the egg in the surround circle and top with beef slices) Serve with kimchee and sriracha sauce.

    cravings

    I was reading through one of my cookbooks and found a recipe for a tuna and avocado bowl that sounded really appealing. Then I remembered what I always order when I go to Thaifoon for lunch. And then I couldn't stop thinking about it. I had fresh tuna steaks, so all I had to get were avocados. I took what I liked from both dishes and made my own version, which I absolutely loved. I think we'll be eating it a lot this Summer.
     This dish has just the right balance of fresh and rich and bright flavors. And fresh tuna is perfected in combination with fresh ginger. One of my favorite ingredients. Ever.
     And one major appealing part of this dish is that it takes about 5 minutes to put together. The tuna should definitely be served pretty rare, and other than the rice, that's the only thing that gets cooked. So cook your rice ahead of time, or you'll be sitting around waiting for it and picking at the succulent pieces of fish and avocado. Yum!

    Tuna and Avocado Rice Bowl
    serves 4
    3 medium tuna steaks
    3 avocados
    canola oil
    juice of 1/2 lime

    for the dressing: (approximate measurements, adjust to taste)
    toasted white sesame seeds
    2 tablespoons soy sauce
    1 tablespoon garlic infused olive oil, extra virgin olive oil, or sesame oil
    1/2 tablespoon grated fresh ginger
    juice of 1/2 lime
    1/4 t sugar or honey
    1 scallion, minced
    1. Season both sides of the tuna steaks with salt. Heat a tablespoon of canola oil in a large skillet over medium-high heat. Sear the tuna on one side, about 1.5 minutes. Flip over, and sear the other side. Remove from heat and let rest.
    2. Peel and dice the avocado into a 1 inch dice. Sprinkle with juice of half a lime.
    3. In a large bowl, whisk together all of the ingredients for the dressing. Add all of avocado and tuna and toss to combine. Serve over rice and garnish with more toasted sesame seeds.

    pizza

    On my old blog, I often talked about my favorite bread book.And unfortunately, since it's not my recipe, I can't share the recipe with you. (But like I've suggested over and over, go out and buy the book! It'll change your life, seriously) I love it. I don't buy bread anymore. And the amazing part is that this recipe is so versatile and stays in your fridge for up to 2 weeks, so I can make a fresh loaf of bread pretty much whenever I want.
    Which is why pizza is a last minute, quick dinner at our house. And it's completely from scratch. If you don't have this book, (go out and buy it, or) you can use store bought pizza dough or any other pizza dough recipe, of course. But it won't be as convenient as what I do several times a month.
    This week, I was feeling a bit splurgy and bought a bunch of fresh mozzarella (which someday soon I hope to make myself), so there was no question in my mind that I needed to make a Margherita pizza. It's the best way to use fresh mozzarella. It's the most beautiful, simple way to enjoy the creamy flavor. Pizza dough, fresh mozzarella, tomatoes, basil, olive oil. A teeny bit of salt to taste. I went one step further and infused my olive oil with garlic, just for more good flavor.
    It might seem too simple, but sometimes simple is the best way to go. Just make sure you have the best quality ingredients available to you (& your budget), and you'll love the results. That's my whole theory about cooking from scratch anyway.

    Margherita Pizza
    makes an 8~10 inch pizza
    1/4 lb (ish) pizza dough
    a mixture of tomatoes, as much or as little as you want on your pizza (I used "campari" and "golden sweet cherries"), sliced
    basil
    fresh mozzarella slices
    garlic infused olive oil*
    kosher salt to taste
    cornmeal
    1. Preheat your baking stone in the oven to 500°F (or higher, if your oven gets hotter). Using a paper towel, blot and press the tomato and mozzarella slices to remove excess moisture.
    2. Roll the dough out as thin as you can without tearing, about 8~10 inches in diameter. Place on a (generously) cornmeal coated pizza peel, and work quickly.
    3. Evenly place slices of mozzarella cheese, avoiding the outer inch of the dough to prevent the cheese from melting and sliding off of the dough. Place slices of tomato on top, then drizzle with garlic infused olive oil. Sprinkle lightly with salt, then quickly slide the pizza onto the stone with a quick, thrusting motion. Bake in the oven for 10~12 minutes, until the cheese and tomatoes are browned and the crust is crisp. Let cool slightly before serving.
    Garlic Infused Olive Oil
     1/2 cup good extra virgin olive oil
    3~6 garlic cloves, peeled and crushed
    1. In a medium saucepan, pour the olive oil and add the crushed garlic cloves. Heat over medium-low heat. If the garlic begins to brown, turn the heat down. Let the flavors steep for at least 10 minutes, but the longer you go, the more flavor you get. But make sure the garlic doesn't brown or you'll get a bitter oil and lose the olive flavor.

    chicken

    Once in a while, I crave a garlicky, lemony roasted chicken. With roasted potatoes, homemade rolls, and some kind of green vegetable. Like broccoli or asparagus. Or some sautéed leafy greens. But midweek, I don't have time to invest into a roasted chicken, or homemade rolls. And with 2 little kids and a dog running around, it's a major health hazard to pull out a whole raw chicken, not knowing what adventure will be waiting around the corner for me.
    ... But I wanted chicken tonight. A good one. I had bought some cute little new potatoes and broccoli rabe, and they screamed out to me for a juicy, whole bird. So I spatchcocked it. Now, before you gasp, let me inform you that this is a specific term used for chicken or other small birds, when using a similar technique to butteryflying. It makes cooking the whole bird in a shorter amount of time possible. And you still get a crispy skin and juicy, flavorful interior.
    But, I have a confession. I hate working with poultry. The whole cross-contamination thing really makes me nervous, and I get a little obsessive with the clorox wipes on EVERY surface of my kitchen following any touching of it. And if you're like me, cutting through chicken ribs with your kitchen shears may take some getting used to. So brace yourself, and get to it! It's a pretty fabulous result, so it'll be worth it.

    weeknight whole chicken dinner
    serves 4~6
    chicken:
    1 whole chicken
    1 head of garlic, peeled, cloves left whole
    1 lemon, sliced
    salt and pepper to season
    1. Pat the chicken dry. Place the whole chicken on a cutting board with the breast side down. Starting at the opening of the cavity, take some sharp kitchen shears and cut through along the right side of the spine. Do the same with the left. Flip the chicken over and press firmly down on the center of the bird to flatten. Often, you'll feel the breast bone break. (That's a good thing) Season the chicken with salt and pepper.
    2. Heat a large lidded skillet or sauté pan over medium-high heat. Pour about 1 tablespoon canola oil (or other high-smoke point, neutral flavored oil) into the bottom of the pan. Place chicken in the pan skin-side down. Once you get a good sear, add the garlic cloves and lemon slices and place the lid on. Turn the heat down to medium, and let cook through. If the skin is burning before the meat is cooked through, add a little water or chicken stock to create some steam. Using an instant-read thermometer, check the temperature of the meat in the thickest part of the thigh (I always check the thigh and the breast), avoiding the bone. It should reach 165°F.
    3. Serve with browned side up.
    potatoes:
    28 oz (that was the size of the bag I got, but anywhere between 24~32 oz would work) variety of new potatoes, scrubbed and trimmed
    6 shallots, peeled, tops and bottoms trimmed, and cut in half (pole-to-pole)
    1 sprig rosemary
    1 T butter
    salt and pepper to taste
    1. In a heavy bottom, large skillet, heat 1 tablespoon of oil over medium-high heat. Place shallots and potatoes, rosemary, and salt and pepper. Toss to coat. Let cook, tossing occasionally, until the potato skins start to wrinkle and brown and the shallots caramelize. 
    2. Add 2~3 tablespoons of water and place the lid on top until potatoes are cooked through. Once cooked through, remove lid and cook until water is all evaporated. Add butter and swirl to coat. Remove rosemary stem. Serve immediately.
    broccoli rabe:
    1 bunch broccoli rabe, broccolini, baby broccoli (whatever you want to call it)
    olive oil
    salt to taste
    1. Preheat the oven to 400°F. Trim bottom 1/2~1 inch of stems. In a large bowl, toss the broccoli rabe, salt, and olive oil.
    2. On a baking sheet, place an single layer of the broccoli rabe. Roast in the oven until the tips get crispy and the stems are tender crisp, about 15 minutes.

    science experiment

    When I was little, my parents took us to this Italian restaurant in Tokyo once in a while. I don't remember much from it except the warm, quaint ambiance and a couple of items off of the menu. My sister always got the fresh papardelle with tomato cream sauce and I always got the spinach fettuccine with salmon cream sauce. And for some reason, though I've successfully recreated the papardelle as best as my childhood memory will let me, I've never attempted the spinach fettuccine with salmon. I'm not sure why. So finally, after writing about homemade pasta last week, I decided it was definitely time.
    Here's the thing about spinach pasta. It can be done 2 ways. You can just chop up some spinach and add it into your pasta dough, but that'll add unneccesary water from the spinach, and can possibly result in the wrong texture. As well as a not-so-smooth color. The other way is to extract the chlorophyll from the leaves themselves, which results in a more cohesive color, and doesn't change the texture of the pasta. (But then it's not really "spinach" pasta anymore, it's more just a natural green pasta. You can use any dark, leafy greens for this) So I decided to go the hard route. Just to see if I could.

    When I was talking to my sister about this method last week, she joked and said it sounds like a science experiment. And it does, doesn't it? But I guess a lot of cooking is a bit of an experiment. But it made me feel cool that I learned a cooking method that involves the word "extract". There's something so advanced about that. Though I am no where near advanced.
     
    Now, it is a little labor intensive. But so worth it! The resulting color is so spectacular! And tossed with salmon gently poached in a rich milky-cream sauce, you just can't go wrong ... Well, unless you're eating like this everyday. Don't be deceived by the health benefits of the salmon and spinach here, folks. This is not a healthy dish. But for a special occasion, PLEASE try it. It'll change your life:)
    As for the salmon, try to find the thicker fillets. As opposed to the thin, triangular shaped fillets, which as a less desired cut of the fish. The thin fillets come from the tail end and cook too fast to be poached well. The thicker fillets tend to have more fat marbled in (and fat=flavor), are easier to skin (if you get them skin-on), and cook more evenly. Of course, if you don't live in the Pacific Northwest where you can get the best salmon, there might be slim pickings. Like where I am in the midwest. Ah, how I long for Portland salmon. So you Oregonians reading this, please buy good salmon for the rest of us. Make this for a special occasion and splurge a little on the fish. You'll be so glad you did.

    And I'll be jealous you did. My mouth is watering just thinking about it.

    How to extract chlorophyll from leafy greens to make pasta
    from Essentials of Cooking by James Peterson
    ingredients:
    1/2 lb spinach (or other leafy greens) leaves, cleaned and stems removed
    cold water

    equipment:
    blender
    medium sauce pan
    fine mesh strainer (or a medium mesh strainer with cheese cloth)
    ladle
    1. Place the leaves in the blender. Pour enough water to go half way up the leaves. Purée for about a minute, until it becomes mostly smooth, like a soup.
    2. Strain the purée in a fine mesh strainer, letting the reserved green liquid drain into a heavy-bottom medium saucepan. Gently press down on the solids with the back of a lade to get as much liquid out as you can. You can discard the solids. (Or use them in something else like spinach hummus. Yum!)
    3. Heat the reserved liquid over medium heat until floating green clumps appear. Drain immediately through a fine mesh strainer. This time, don't press down on the solids and be patient. The green paste in the strainer is the chlorophyll. Use the chlorophyll within 2 days or transfer it to a small jar and cover its surface with olive oil. Store in the fridge for a few weeks.
    Add extracted chlorophyll to food processor bowl with the eggs in step 1 of my favorite fresh pasta recipe.

    Fresh Spinach Fettuccine with Salmon Cream sauce
    4 portions of center-cut salmon fillet. Skinned, patted dry, cut into 1 inch cubes, and sprinkled generously with kosher salt
    1 recipe spinach fettuccine
    1/2 cup heavy cream
    1/2 cup whole milk
    1 garlic clove, sliced very thin
    1. In a deep sauté pan, heat the cream, milk, and garlic over medium-low heat, stirring occasionally. Once it comes to a simmer, turn the heat off, add the salmon, and cover. Meanwhile, Cook the pasta to al dente.
    2. The salmon will cook quickly, so keep an eye on it. Once it's barely cooked through, about 3~5 minutes, toss with the pasta and serve immediately. 
    And since I trust Scott Conant when it comes to pasta, and he says you don't ever put cheese on a fish dish, I don't recommend doing that.